Hi! Welcome to the tutorial, Set Up Google Search Console For Wordpress And Verify Ownership And Submit Sitemap. As the name suggests already, we're going to learn how to set up Google Search Console for our Wordpress Website, and after that, we'll verify ownership of our site. After we have done the above, we'll also generate and submit our Wordpress Sitemap to Google Search Console.
Set Up Google Search Console For Wordpress - Verify Ownership And Submit Sitemap
Table Of Content
Domain Name Provider (for self-hosted sites)
Select the Domain Name Provider option. A drop-down list will display.
Choose the company your domain name is registered with. Follow the instructions displayed, will vary according to which domain name provider you have. Click the Verify button.
Google Analytics
If you’ve already set up Google Analytics for your website and you have Administrator permissions, you can verify your site ownership instantly.
Select the 'Google Analytics' option. Click the Verify button.
Google Tag Manager
You have to have ‘manage’ permissions on the Google Tag Manager account
Select the Google Tag Manager option.
Click the Verify button.
Note: If you already have at least one property set up, you will see that display instead of the URL entry shown above. To add another website or app, to the extreme upper right corner of the Google Search Console page and just click the Add a Property button and then enter the new site’s URL. If you have multiple sites, you need to click on the drop-down arrow.
Log in to your WordPress admin.
What we’re going to do first is make sure that the Yoast plugin is all ready to create a sitemap for you. To do so, we’ll need to turn on Yoast’s advanced settings.
Click on the Yoast plugin.
It has a “Y” icon, and says “SEO.” It should be located on the left sidebar.
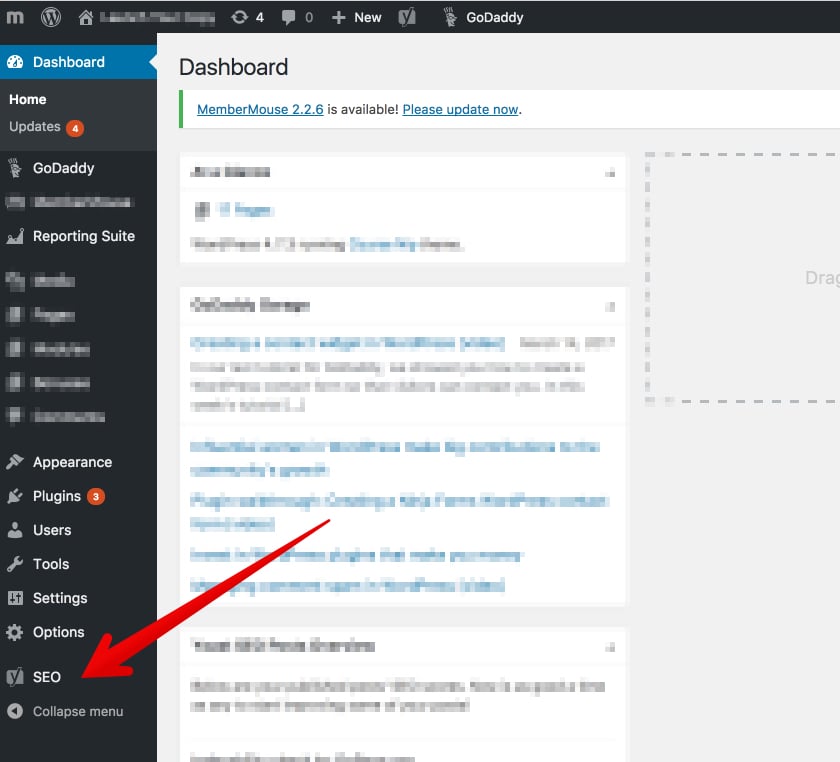
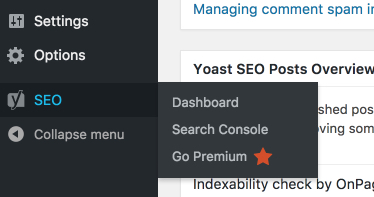
Click the “Dashboard” option.
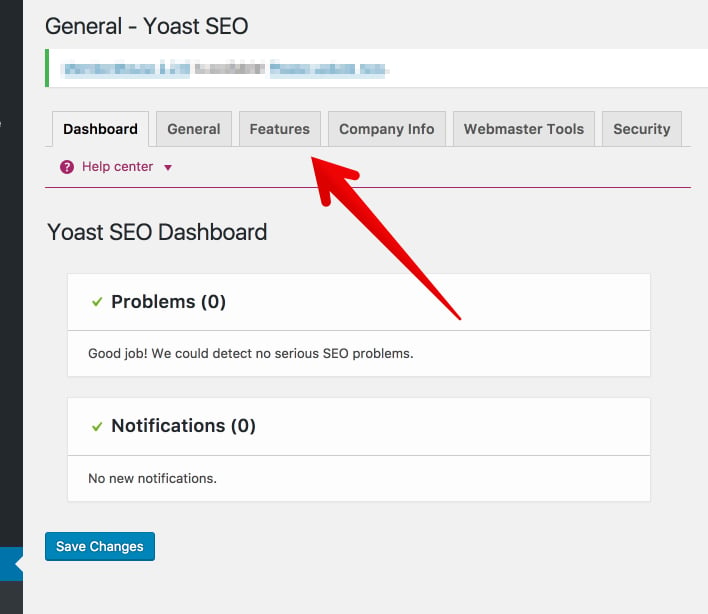
From the Dashboard, click “Features.”
From the Features tab, find “Advanced settings pages.”
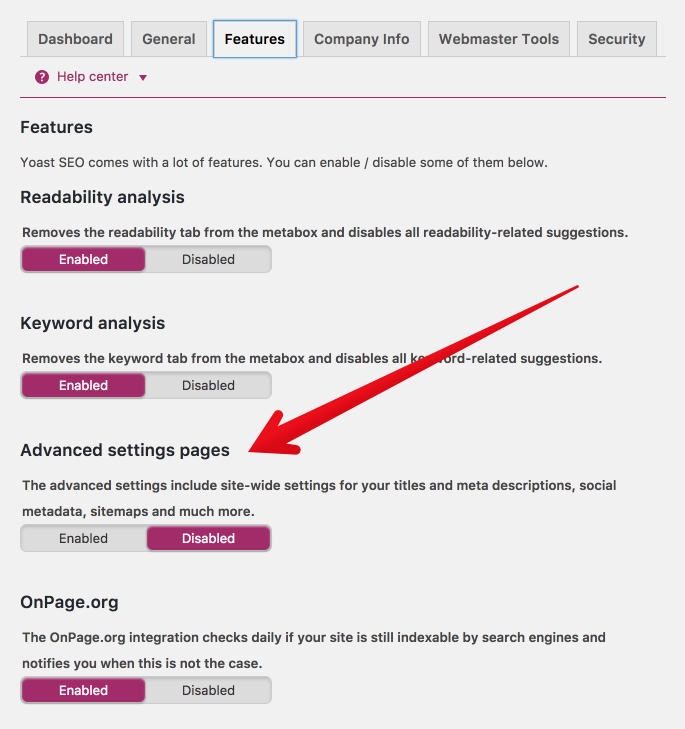
Switch the advanced settings to “enabled.”

Now, scroll to the bottom and click “Save Changes.”
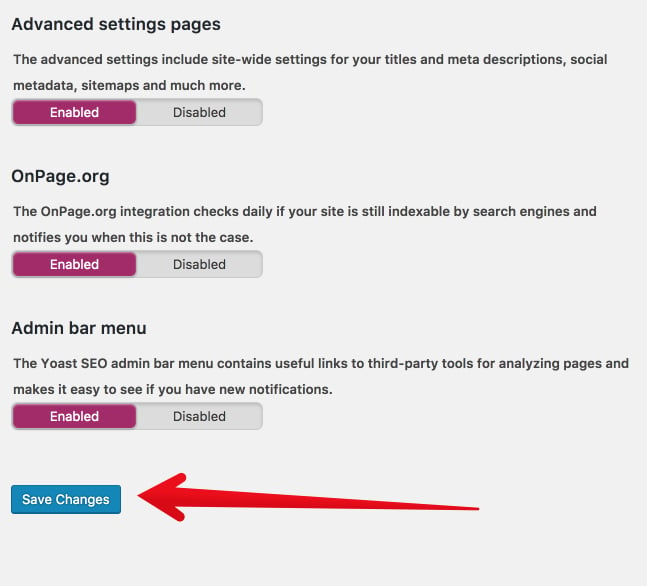
Great! Now that we’ve turned on Yoast’s advanced features, we have some fresh SEO firepower. You should see that the Yoast menu in the left sidebar has changed. There are a few additional options.
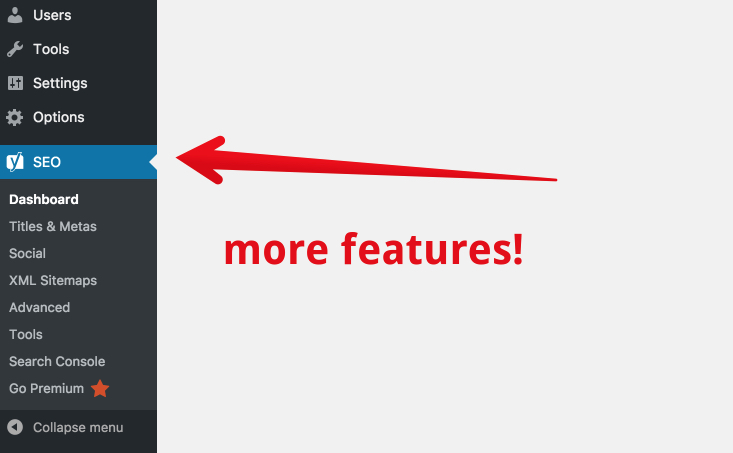
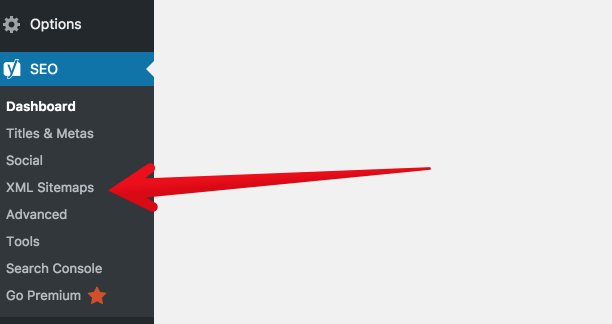
This is where we get into the details of creating your XML sitemap. It’s very simple to do, but I’ll give you the instructions in a detailed way. In the Yoast menu, click XML sitemaps. Note: If you don’t see the menu, click on the “Y SEO” main menu to make the dropdown menu expand.
Here is where you set up your XML sitemap functionality. This is the first tab, “General.” You can leave the settings where they are.
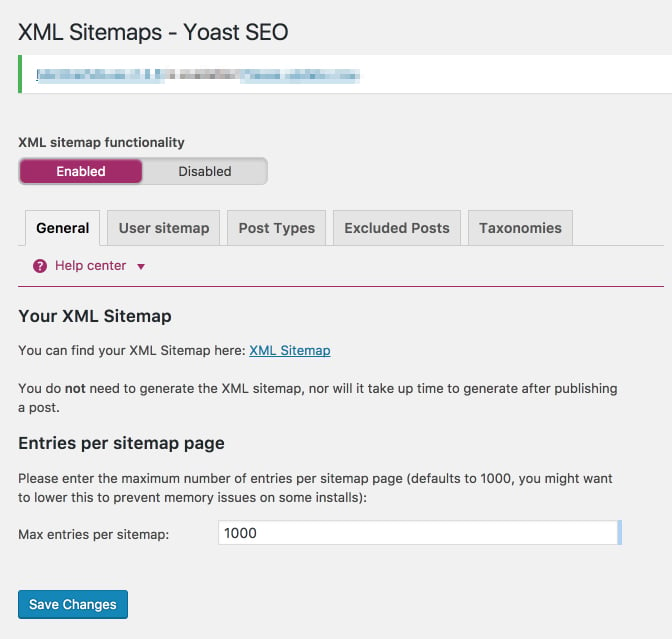
If you make any changes, be sure to click the blue “save changes” button at the bottom. Click the User sitemap tab. If your WordPress site has multiple authors, and you want their author archive URLs to be indexed, you can enable this tab. If you leave it disabled, it won’t harm the full functionality of the sitemap. I’ve left it disabled here because the WordPress site I’m using has a single author.
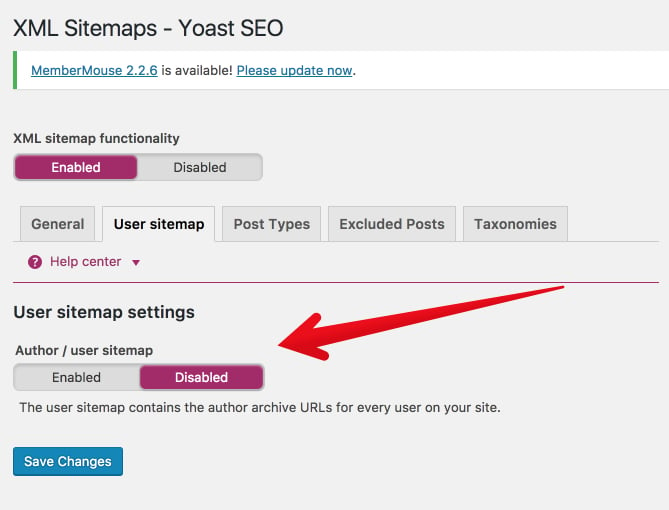
If you’ve changed anything, click “save changes.” Click on Post Types.
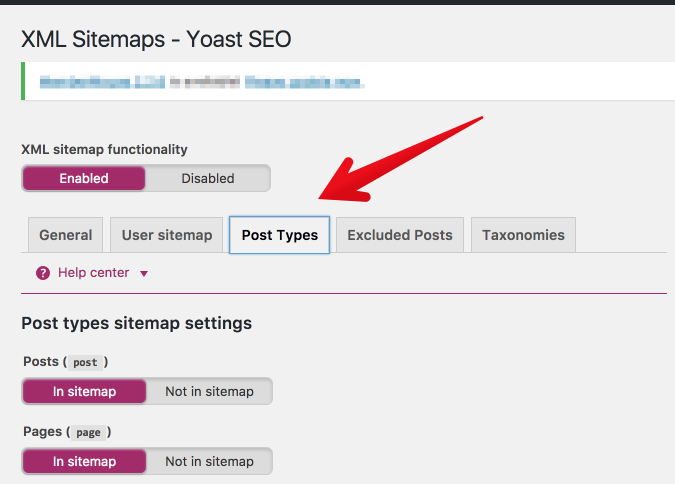
In this section, you’ll decide which types of posts should be indexed. In most cases, you’ll want to include everything (including media) “in sitemap.” If you prefer to keep some of your content hidden or gated, then leave it off the sitemap. Not sure what to do? Keep everything “In sitemap.”
Again, click “save changes.”
Now, click “Excluded posts.”
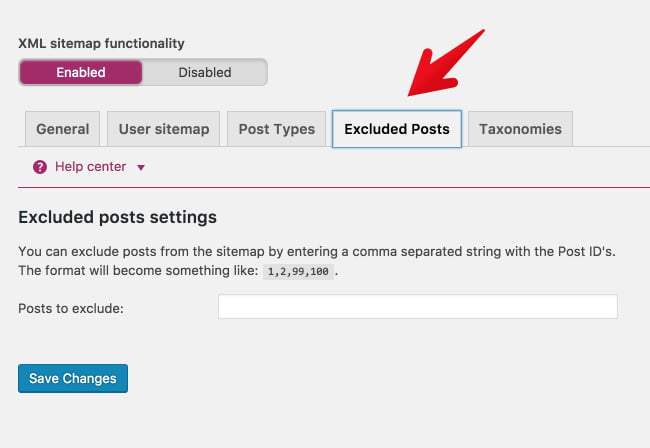
Do you have any posts that you know you want to keep off the sitemap? If so, add them here. Please keep in mind, if you keep a post off of the sitemap, people can still find it, access it, and view it. And, as if often the case, Google might still index it. If you’ve added any posts to the exclusion list, click “save changes.”
Finally, click “Taxonomies.”
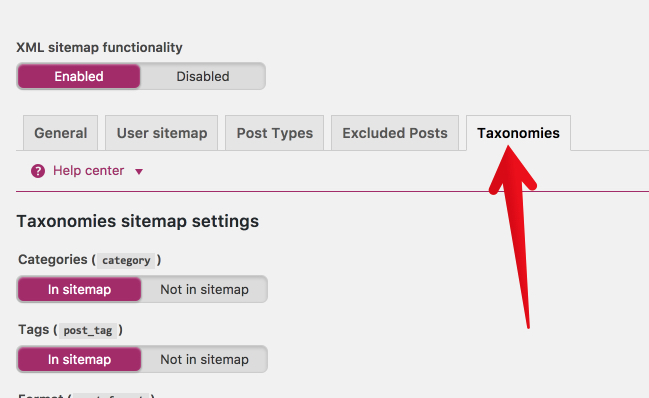
Most likely, you’ll keep the settings here the same. The more tabs you keep “in sitemap,” the fuller and more helpful your XML sitemap will be. If you do make changes, be sure to click “save changes.” Okay, your sitemap is ready! Let’s take a look at it! Go back to the “General tab.”
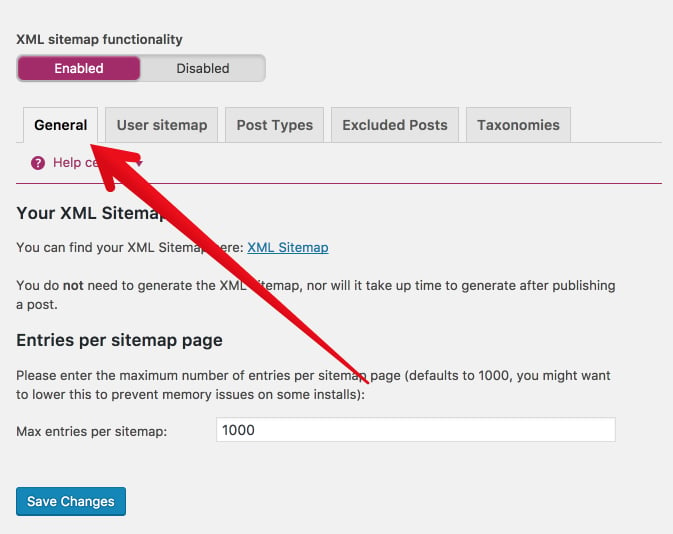
Under the heading “Your XML Sitemap,” click to view your XML sitemap.
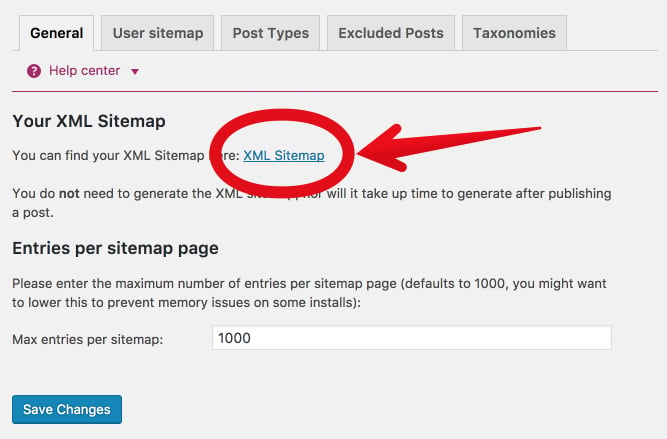
That’s your brand new, shiny XML sitemap. When you open it, you’ll be taken to an actual page on your site. Now, for a small but important part. Copy the last part of that URL
That’s the part of the URL that you’re going to submit to Google in the next step. I’ll include it in the step below so you can easily copy and paste it.
Now, it’s time to submit your Wordpress sitemap to Google.
Step 3: On the left side of the page, click on Sitemaps under the Index section.
Step 4: Add the below code in the provided text field.
Step 6: Press the “SUBMIT” button.
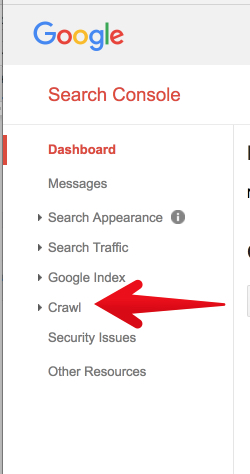
In the left sidebar, click “Crawl.”
Then, click “Sitemaps.”
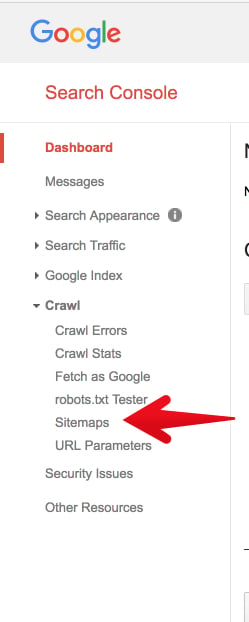
If this is the first time you’ve ever created or submitted a sitemap, there will be nothing to show.
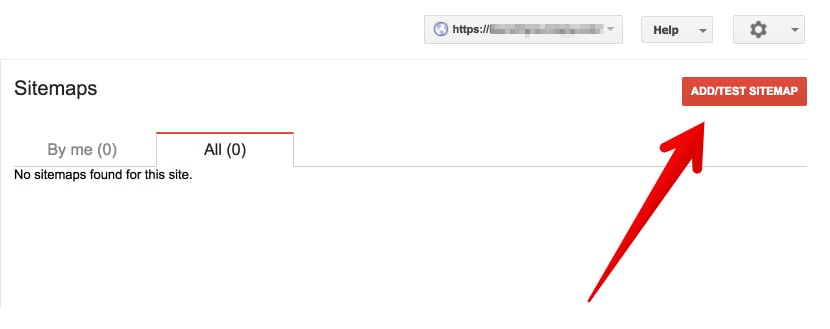
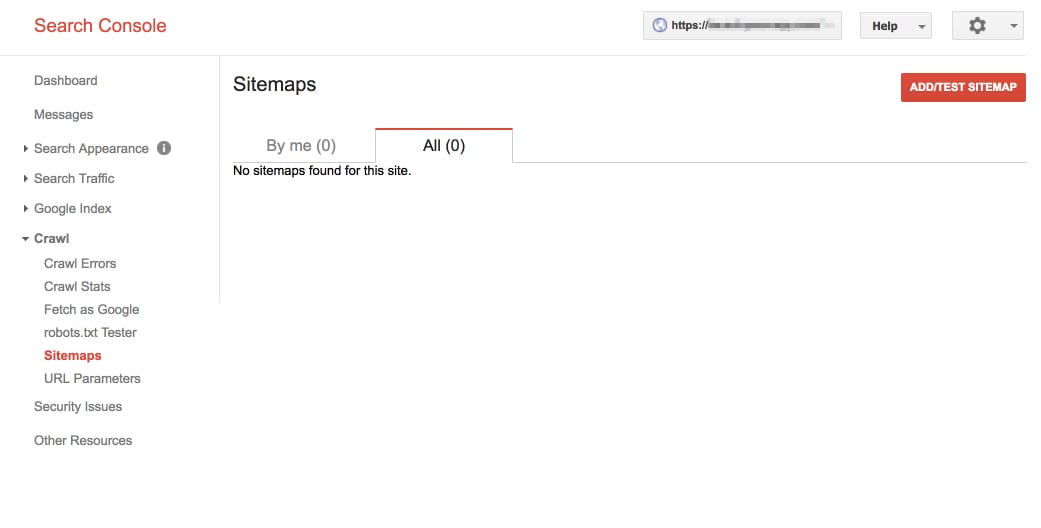
Click “Add/Test Sitemap.” A small box will appear with a place to add your sitemap URL.
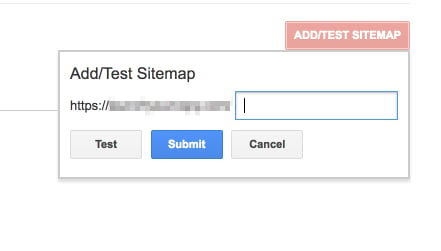
This is where you paste in the section of the URL from your sitemap:
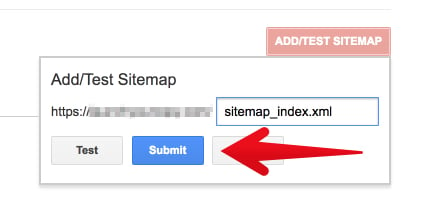
Google Search Console will confirm your submission with the message, “Item submitted.” Go ahead and refresh the page.

After a few minutes of processing, Google will provide a full report of how your sitemap is functioning. That’s it! You’ve successfully generated an XML sitemap for Wordpress, submitted it to Google.
Have you set up your Google Search Console, created and submitted an XML sitemap for your website? What benefits have you noticed? Did you encounter any challenges? What other SEO-related things do you do for faster indexing of your blog? Remember to share this post with anyone who might benefit from this information, including your Facebook friends and groups, Twitter followers and your LinkedIn Friends! Thanks!
full-width
Set Up Google Search Console For Wordpress - Verify Ownership And Submit Sitemap
Table Of Content
- What Is Google Search Console
- Google Search Console Tools
- Who Should Use Google Search Console
- Google Search Console Product Requirement
- Google Search Console Features
- How To Set Up Google Search Console
- How To Verify Your Ownership In Google Search Console
- How To Generate A Sitemap For Wordpress Website
- How To Submit Wordpress Sitemap In Google Search Console
What Is Google Search Console: About Search Console?
Google Search Console is a web service by Google which allows webmasters to check indexing status and optimize visibility of their websites. Until May 20, 2015, the service was called Google Webmaster Tools. In January 2018, Google introduced a new version of the search console, with changes to the user interface. Google Search Console is a free service offered by Google that helps you monitor, maintain, and troubleshoot your site's presence in Google Search results. You don't have to sign up for Search Console to be included in Google Search results, but the Search Console helps you understand and improve how Google sees your site.Search Console Offers Tools And Reports For The Following Actions:
- Confirm that Google can find and crawl your site.
- Fix indexing problems and request re-indexing of new or updated content.
- View Google Search traffic data for your site: how often your site appears in Google Search, which searches queries show your site, how often searchers click through for those queries, and more.
- Receive alerts when Google encounters indexing, spam, or other issues on your site.
- Show you which sites link to your website.
- Troubleshoot issues for AMP, mobile usability, and other search features.
Who Should Use Search Console?
Anyone with a website! From generalist to specialist, from newbie to advanced, Search Console can help you.- Site administrators: As a site admin, you care about the healthy operation of your site. Search Console lets you easily monitor and, in some cases, resolve server errors, site load issues, and security issues like hacking and malware. You can also use it to ensure any site maintenance or adjustments you make happen smoothly with respect to search performance.
- Web developers: If you are creating the actual markup and/or code for your site, Search Console helps you monitor and resolve common issues with markup, such as errors in structured data.
- Business owners: Even if you won't be using Search Console yourself, you should be aware of it, become familiar with the basics of optimizing your site for search engines and know what features are available in Google Search.
- SEO specialists or marketers: As someone focused on online marketing, Search Console will help you monitor your website traffic, optimize your ranking, and make informed decisions about the appearance of your site's search results. You can use the information in the Search Console to influence technical decisions for the website and do sophisticated marketing analysis in conjunction with other Google tools like Analytics, Google Trends, and Google Ads.
Google Search Console Product Requirements
Search Console is a web-based product that you use in your browser. Here's what you need to use Google Search Console:- A recent version of any of the following browsers: Chrome, Firefox, Edge, Safari.
- Both cookies and JavaScript must be enabled in your browser.
- A valid Google account.
Google Search Console Features
- The service includes tools that let webmasters:
- Submit and check a sitemap.
- Check and set the crawl rate, and view statistics about when Googlebot accesses a particular site.
- Write and check a robots.txt file to help discover pages that are blocked in robots.txt accidentally.
- List internal and external pages that link to the website.
- Get a list of links that Googlebot had difficulty in crawling, including the error that Googlebot received when accessing the URLs in question.
- See what keyword searches on Google led to the site being listed in the SERPs, and the total clicks, total impressions, and the average click-through rates of such listings. (Previously named 'Search Queries'; rebranded May 20, 2015, to 'Search Analytics' with extended filter possibilities for devices, search types and date periods).
- Set a preferred domain (e.g. prefer example.com over www.example.com or vice versa), which determines how the site URL is displayed in SERPs.
- Highlight to Google Search elements of structured data that are used to enrich search hit entries (released in December 2012 as Google Data Highlighter).
- Receive notifications from Google for manual penalties.
- Provide access to an API to add, change and delete listings and list crawl errors.
- Rich Cards a new section added, for better mobile user experience.
- Check the security issues if there are any with the website. (Hacked Site or Malware Attacks)
- Add or remove the property owners and associates of the web property.
How To Set Up Google Search Console
Start By Signing In To Google
Google wants to connect the dots between your website (or app) and you, so first you must log in to your Google account. You can sign in through Gmail or anywhere you have a Google account. While signed in to your Google account, navigate to this page in any browser: https://search.google.com/search-console/about. Or Sign in to Google Search Console through your Google account: https://www.google.com/webmasters/tools/
If you have already registered for a Google Analytics account, log in to the Search Console using your Analytics account user and password information. You can also log in with a Google account. If you don’t have a Google account, you must set one up. Go to Google.com and click Sign in. Then choose to create an account and complete the form. (Bonus: You now have access to Gmail and all other Google applications.)
If you have already registered for a Google Analytics account, log in to the Search Console using your Analytics account user and password information. You can also log in with a Google account. If you don’t have a Google account, you must set one up. Go to Google.com and click Sign in. Then choose to create an account and complete the form. (Bonus: You now have access to Gmail and all other Google applications.)
Set Up Google Search Console
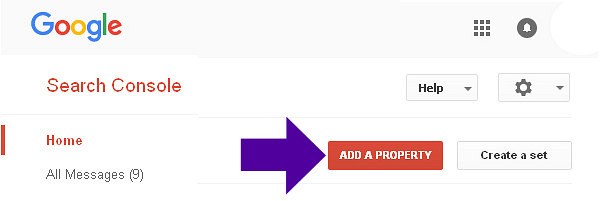
Click the Start Now button.Type in your website (the domain URL, such as http://www.example.com/) or app (for example, android-app://com.eample/) and then click Add Property.
Click ‘Add a Property’.
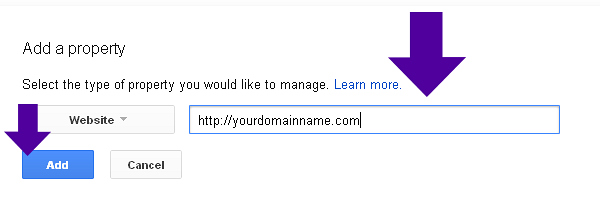
Type in the full path to your domain.
Click ‘Add’.
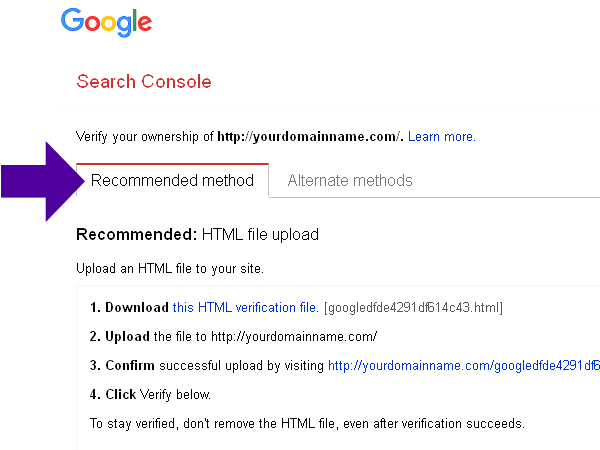
Verify Ownership of your Domain.
Choose from two tabs: ‘Recommended Method’:
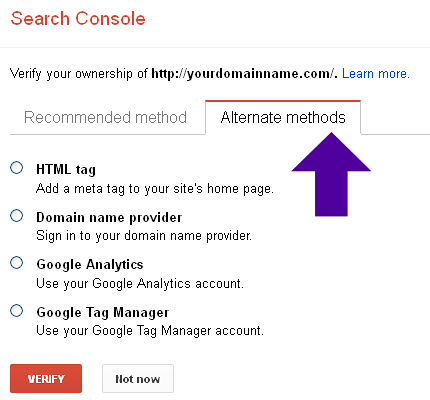
and ‘Alternate Methods’:

Type in the full path to your domain.
Click ‘Add’.

Verify Ownership of your Domain.
Choose from two tabs: ‘Recommended Method’:

and ‘Alternate Methods’:

Google Search Console Verification Methods: How To Verify Your Site In Google Search Console
HTML Tag
Select the 'HTML tag' option.
Copy the Google display text line in the shaded box (beginning with <meta name=). Open your home page in your preferred website editor and paste that text into the Head section (near the top) of your home page. This creates a new Meta Tag. Save your changes in your editor program. Go back to the Google Search Console setup page, and click the Verify button.
Domain Name Provider (for self-hosted sites)
Select the Domain Name Provider option. A drop-down list will display.
Choose the company your domain name is registered with. Follow the instructions displayed, will vary according to which domain name provider you have. Click the Verify button.
Google Analytics
If you’ve already set up Google Analytics for your website and you have Administrator permissions, you can verify your site ownership instantly.
Select the 'Google Analytics' option. Click the Verify button.
Google Tag Manager
You have to have ‘manage’ permissions on the Google Tag Manager account
Select the Google Tag Manager option.
Click the Verify button.
Click the Add a property button
After you click on "Add property above, a window will pop out, here you two options either to enter your domain or URL, choose the second option and enter your site URL and hit the "continue" tap.
On the Google Search Console dashboard, at the right side, scroll to the bottom and click on "Settings" under Property settings, you'll see "ownership verification" click on the arrow at the extreme end. You'll be provided with several verification methods, proceed and verify your site. Note, if you've already added a site and verified it, the new site will be verified automatically, and a message will be displayed as such, but still, proceed and add other verifications method to it. That is it, go ahead and verify your site as explained above and below!
Google Search Console Verification Methods: How To Verify Your Site In Google Search Console
- HTML file upload: Upload a verification HTML file to a specific location of your website.
- Domain name provider: Sign in to your domain registrar (like GoDaddy, eNom, or networksolutions.com), and verify your site directly from GSC or add a DNS TXT or CNAME record.
- HTML tag: Add a <meta> tag to the <HEAD> section of a specific page’s HTML code.
- Google Analytics tracking code: Copy the GA tracking code that you use on your site. (You need “edit” permission in GA for this option.)
- Google Tag Manager container snippet code: Copy the GTM container snippet code associated with your site. (You need View, Edit, and Manage container-level permissions in GTM for this option.)
Get Started Using Google Search Console
Once Google verifies your site or app ownership, you can log in and start using your newly set up Google Search Console. Keep in mind that data takes time to collect, so it may be a few days before your new account has data worth looking at. This is an excellent time to take care of a basic but important search engine optimization task: creating a sitemap that will help Google find and index your pages faster. To access the tools, go to http://www.google.com/webmasters/tools/. Sign in, then click the name of the website or app you set up in Google Search Console. Once inside, explore the left-hand menu to try out the many tools and reports. Next is to create and submit your website or blog site sitemap, see below:How To Generate A Sitemap For WordPress Website:
Sitemaps can be generated in different ways depending on the platform you are using for your website. For example, WordPress sitemaps can be easily generated using a popular SEO plugin call Yoast SEO.Log in to your WordPress admin.
What we’re going to do first is make sure that the Yoast plugin is all ready to create a sitemap for you. To do so, we’ll need to turn on Yoast’s advanced settings.
Click on the Yoast plugin.
It has a “Y” icon, and says “SEO.” It should be located on the left sidebar.

Click the “Dashboard” option.

From the Dashboard, click “Features.”

From the Features tab, find “Advanced settings pages.”

Switch the advanced settings to “enabled.”

Now, scroll to the bottom and click “Save Changes.”

Great! Now that we’ve turned on Yoast’s advanced features, we have some fresh SEO firepower. You should see that the Yoast menu in the left sidebar has changed. There are a few additional options.

This is where we get into the details of creating your XML sitemap. It’s very simple to do, but I’ll give you the instructions in a detailed way. In the Yoast menu, click XML sitemaps. Note: If you don’t see the menu, click on the “Y SEO” main menu to make the dropdown menu expand.

Here is where you set up your XML sitemap functionality. This is the first tab, “General.” You can leave the settings where they are.

If you make any changes, be sure to click the blue “save changes” button at the bottom. Click the User sitemap tab. If your WordPress site has multiple authors, and you want their author archive URLs to be indexed, you can enable this tab. If you leave it disabled, it won’t harm the full functionality of the sitemap. I’ve left it disabled here because the WordPress site I’m using has a single author.

If you’ve changed anything, click “save changes.” Click on Post Types.

In this section, you’ll decide which types of posts should be indexed. In most cases, you’ll want to include everything (including media) “in sitemap.” If you prefer to keep some of your content hidden or gated, then leave it off the sitemap. Not sure what to do? Keep everything “In sitemap.”
Again, click “save changes.”
Now, click “Excluded posts.”

Do you have any posts that you know you want to keep off the sitemap? If so, add them here. Please keep in mind, if you keep a post off of the sitemap, people can still find it, access it, and view it. And, as if often the case, Google might still index it. If you’ve added any posts to the exclusion list, click “save changes.”
Finally, click “Taxonomies.”

Most likely, you’ll keep the settings here the same. The more tabs you keep “in sitemap,” the fuller and more helpful your XML sitemap will be. If you do make changes, be sure to click “save changes.” Okay, your sitemap is ready! Let’s take a look at it! Go back to the “General tab.”

Under the heading “Your XML Sitemap,” click to view your XML sitemap.

That’s your brand new, shiny XML sitemap. When you open it, you’ll be taken to an actual page on your site. Now, for a small but important part. Copy the last part of that URL
sitemap_index.xml
That’s the part of the URL that you’re going to submit to Google in the next step. I’ll include it in the step below so you can easily copy and paste it.
Now, it’s time to submit your Wordpress sitemap to Google.
How To Submit Wordpress Sitemap To Google
Step 1: Sign in to your Google Search Console Account. This is the new Google Search Console
Step 2:If you have multiple sites, then select the desired blog you wish to submit the sitemap for. Go to the upper left corner of your Google Search Console to select your site. But if you don't have multiple sites, you may escape Step 2 and move to step 3.
Step 2:If you have multiple sites, then select the desired blog you wish to submit the sitemap for. Go to the upper left corner of your Google Search Console to select your site. But if you don't have multiple sites, you may escape Step 2 and move to step 3.
Step 3: On the left side of the page, click on Sitemaps under the Index section.
The "Sitemaps" page will appear, now at the very top of the page under "Add a new sitemap" you'll see your URL with a blank text field space following it with the word "SUBMIT" at the end.
Step 4: Add the below code in the provided text field.
sitemap_index.xml
Step 6: Press the “SUBMIT” button.
Step 7: Refresh the page.
How To Submit Wordpress Sitemap To Google, Using The Old Google Search Console
In the left sidebar, click “Crawl.”

Then, click “Sitemaps.”

If this is the first time you’ve ever created or submitted a sitemap, there will be nothing to show.


Click “Add/Test Sitemap.” A small box will appear with a place to add your sitemap URL.

This is where you paste in the section of the URL from your sitemap:
sitemap_index.xmlClick “Submit.”

Google Search Console will confirm your submission with the message, “Item submitted.” Go ahead and refresh the page.

After a few minutes of processing, Google will provide a full report of how your sitemap is functioning. That’s it! You’ve successfully generated an XML sitemap for Wordpress, submitted it to Google.
Have you set up your Google Search Console, created and submitted an XML sitemap for your website? What benefits have you noticed? Did you encounter any challenges? What other SEO-related things do you do for faster indexing of your blog? Remember to share this post with anyone who might benefit from this information, including your Facebook friends and groups, Twitter followers and your LinkedIn Friends! Thanks!
Article "Set Up Google Search Console For Wordpress - Verify Ownership And Submit Sitemap" protected


