The Google search console is a must-use tool for every website owner. It is a great way to find out what Google knows about your website, analyze your website’s performance in Google Search and use it to improve your SEO. The first step is to create an account and verify your website and then learn how the different tools and reports work.
Keywords Management
This is where you can see what keywords are performing and who is searching for what terms related to your industry.
Make Changes And Index Your Site
If you’ve made major changes to a website, the fastest way to get the updates indexed by Google is to submit it in the Search Console so they appear in search results.
Automated Diagnostic Notifications
Sometimes things break. Get automated notifications that something’s wrong with your site before any customers can have a poor experience.
Improve Your Website’s Appearance In Search Results
Google Search Console has various resources that can enhance the way your website appears in search. For one, you can use its Data Highlighter to create rich snippets.
Detect Security Issues
Google alerts you if your website has been hacked or is spreading malware. It also provides solutions that webmasters can take to address the problem.
Learn If Your Site Is Mobile-Friendly
You might have optimized your website for mobile, but do you know if Google really considers it as mobile-ready? Fortunately, Search Console comes with the Mobile Usability module, which reveals the problems that may keep your site from being seen as mobile-friendly. Additionally, Search Console offers a free tool that tests your site’s responsiveness on a mobile device.
Address Broken Links
The last thing you want on your website is a broken link. When a link directs users to a page that shows a 404 error, Google will perceive your site as no longer available. If not fixed promptly, it may remove your page from the search results. The error reports in the Search Console will list down the broken links you have at any given time, so you can address them immediately.
Improve Your HTML
There are a lot of issues that can spell trouble for your site. It can be faulty coding, large images, and duplicate title tags. Google Search Console can provide you with HTML Improvement suggestions so you can keep your website in peak performance.
Domain Name Provider (for self-hosted sites)
Select the Domain Name Provider option. A drop-down list will display.
Choose the company your domain name is registered with. Follow the instructions displayed, will vary according to which domain name provider you have. Click the Verify button.
Google Analytics
If you’ve already set up Google Analytics for your website and you have Administrator permissions, you can verify your site ownership instantly.
Select the 'Google Analytics' option. Click the Verify button.
Google Tag Manager
You have to have ‘manage’ permissions on the Google Tag Manager account
Select the Google Tag Manager option.
Click the Verify button.
Note: If you already have at least one property set up, you will see that display instead of the URL entry shown above. To add another website or app, to the extreme upper right corner of the Google Search Console page and just click the Add a Property button and then enter the new site’s URL. If you have multiple sites, you need to click on the drop-down arrow.
An XML sitemap is a way of organizing a website, identifying the URLs and the data under each section. Previously, the sitemaps were primarily geared for the users of the website. However, Google's XML format was designed for the search engines, allowing them to find the data faster and more efficiently.
Sitemaps also help search engines crawl your pages more intelligently. They take ‘and` tags into account and can adjust their crawl frequency accordingly. You get to be a little proactive about getting search spiders to visit your pages. Upping the priority level of a page makes it more likely that pages will be crawled and indexed more frequently and before other, less important parts of your site.
If you’ve got a geo-targeted international site or a site that has the same page translated into multiple languages, you can use your XML sitemap to your advantage. Benefits of XML sitemaps, in summary, including but not limited to the following:
Log in to your WordPress admin.
What we’re going to do first is make sure that the Yoast plugin is all ready to create a sitemap for you. To do so, we’ll need to turn on Yoast’s advanced settings.
Click on the Yoast plugin.
It has a “Y” icon, and says “SEO.” It should be located on the left sidebar.
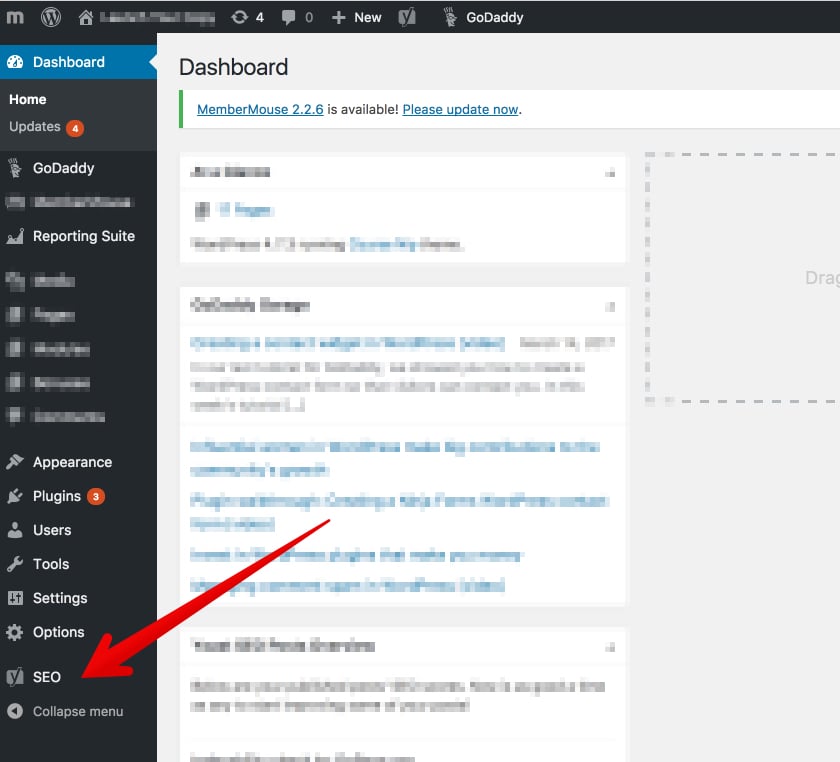
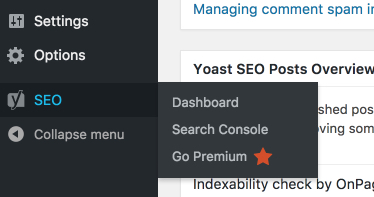
Click the “Dashboard” option.
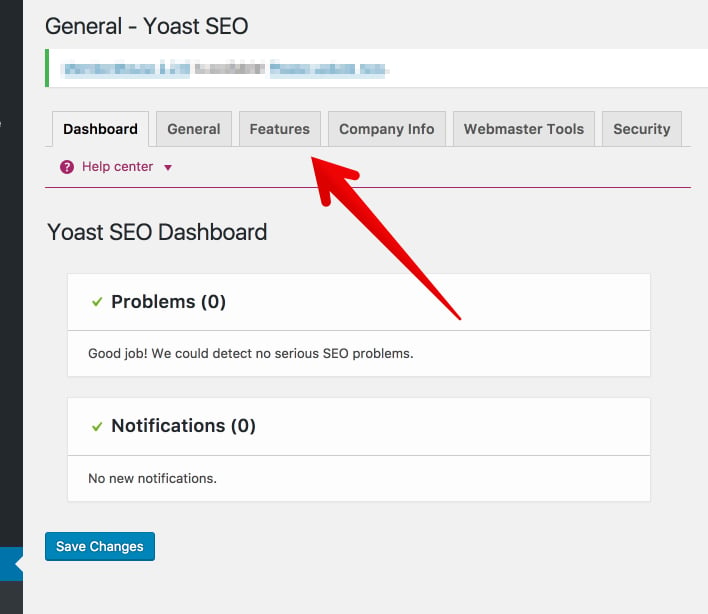
From the Dashboard, click “Features.”
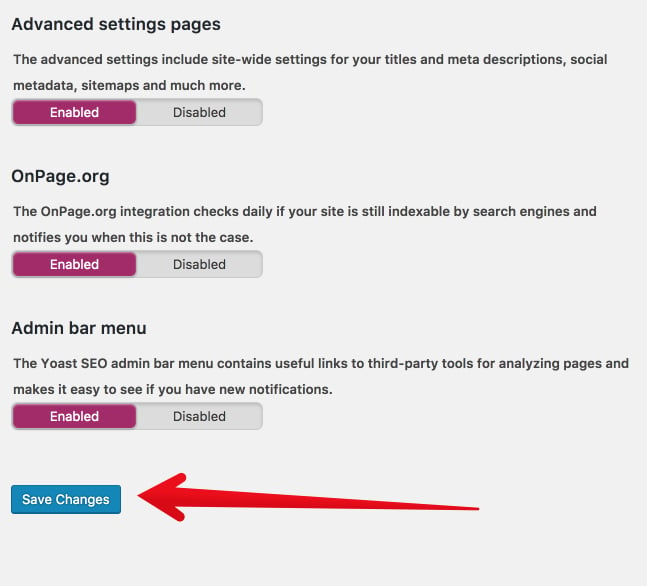
From the Features tab, find “Advanced settings pages.”
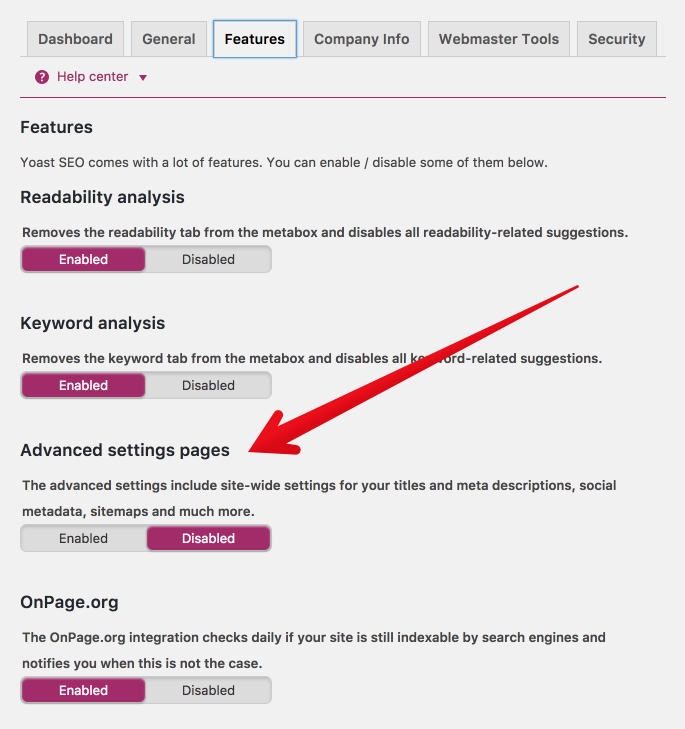
Switch the advanced settings to “enabled.”

Now, scroll to the bottom and click “Save Changes.”
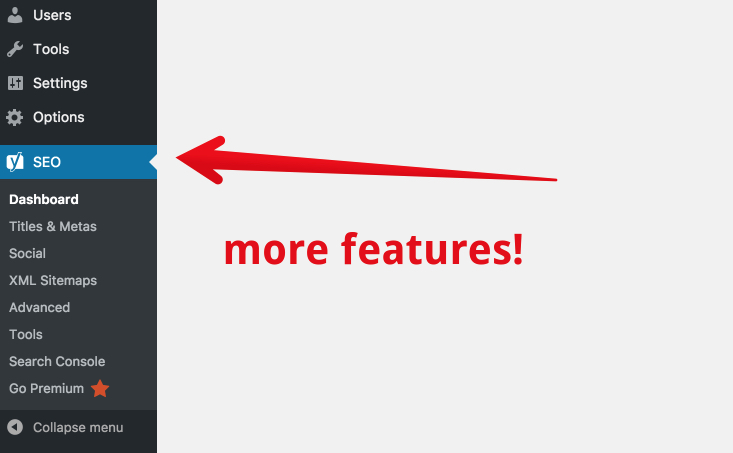
Great! Now that we’ve turned on Yoast’s advanced features, we have some fresh SEO firepower. You should see that the Yoast menu in the left sidebar has changed. There are a few additional options.
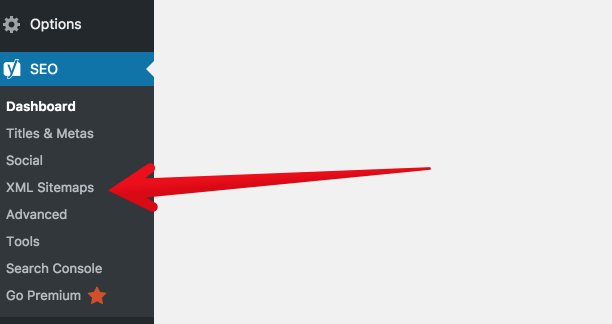
This is where we get into the details of creating your XML sitemap. It’s very simple to do, but I’ll give you the instructions in a detailed way. In the Yoast menu, click XML sitemaps. Note: If you don’t see the menu, click on the “Y SEO” main menu to make the dropdown menu expand.
Here is where you set up your XML sitemap functionality. This is the first tab, “General.” You can leave the settings where they are.
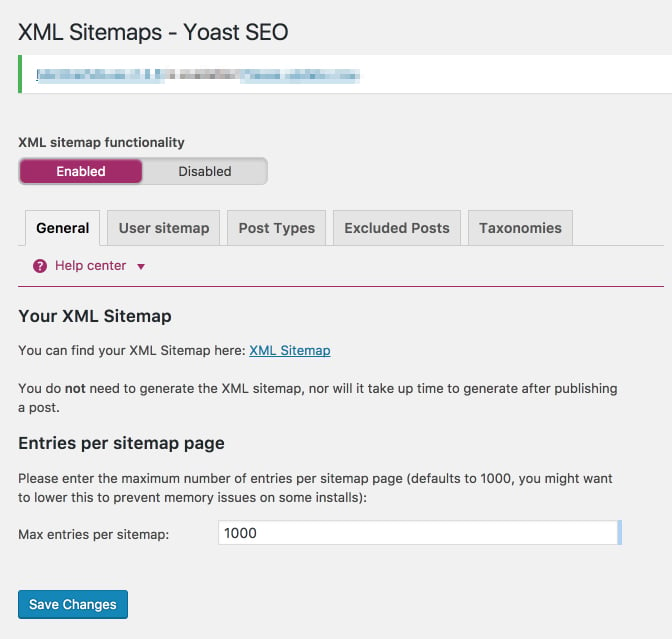
If you make any changes, be sure to click the blue “save changes” button at the bottom. Click the User sitemap tab. If your WordPress site has multiple authors, and you want their author archive URLs to be indexed, you can enable this tab. If you leave it disabled, it won’t harm the full functionality of the sitemap. I’ve left it disabled here because the WordPress site I’m using has a single author.
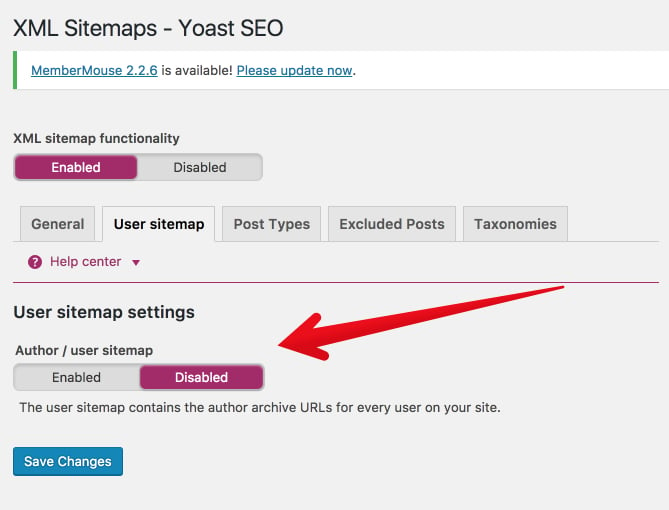
If you’ve changed anything, click “save changes.” Click on Post Types.
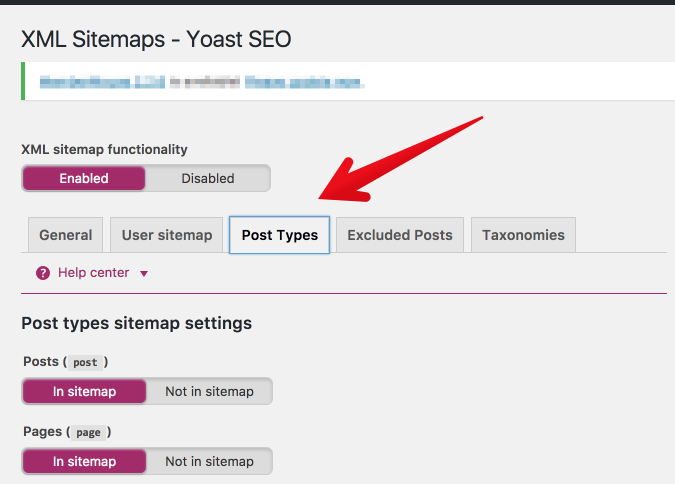
In this section, you’ll decide which types of posts should be indexed. In most cases, you’ll want to include everything (including media) “in sitemap.” If you prefer to keep some of your content hidden or gated, then leave it off the sitemap. Not sure what to do? Keep everything “In sitemap.”
Again, click “save changes.”
Now, click “Excluded posts.”
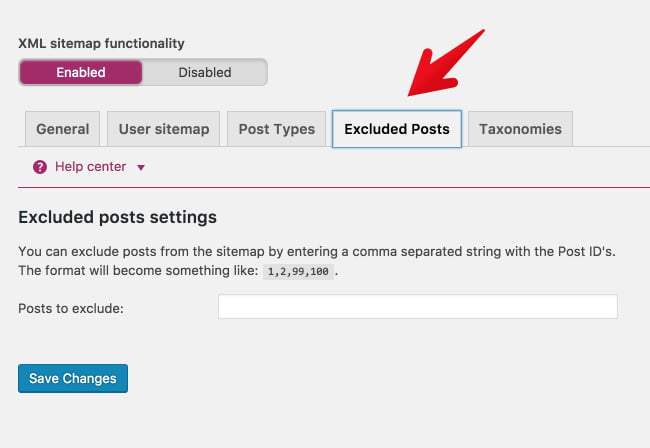
Do you have any posts that you know you want to keep off the sitemap? If so, add them here. Please keep in mind, if you keep a post off of the sitemap, people can still find it, access it, and view it. And, as if often the case, Google might still index it. If you’ve added any posts to the exclusion list, click “save changes.”
Finally, click “Taxonomies.”
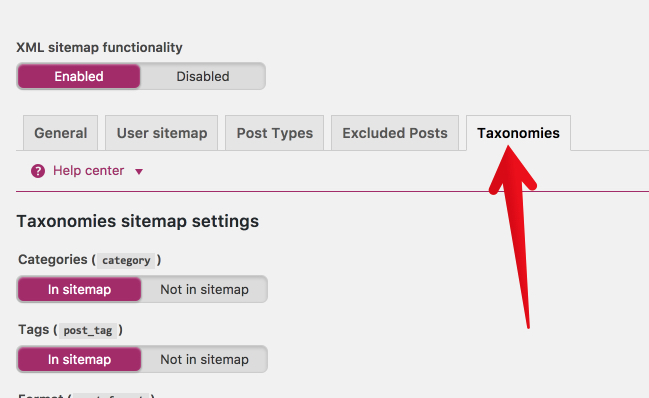
Most likely, you’ll keep the settings here the same. The more tabs you keep “in sitemap,” the fuller and more helpful your XML sitemap will be. If you do make changes, be sure to click “save changes.” Okay, your sitemap is ready! Let’s take a look at it! Go back to the “General tab.”
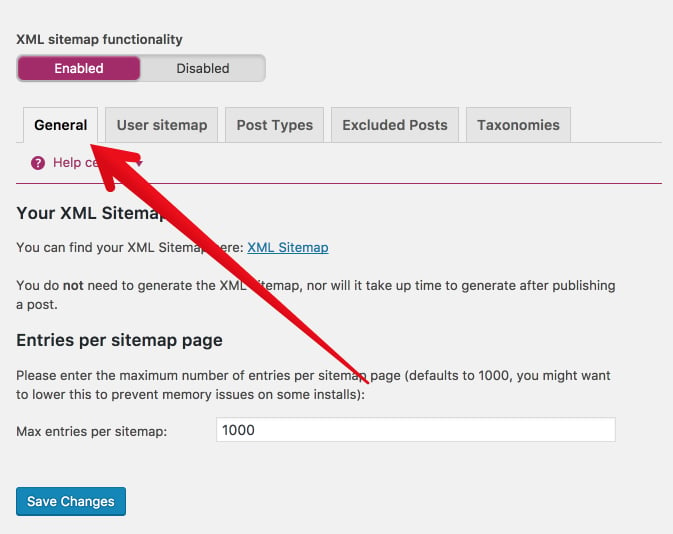
Under the heading “Your XML Sitemap,” click to view your XML sitemap.
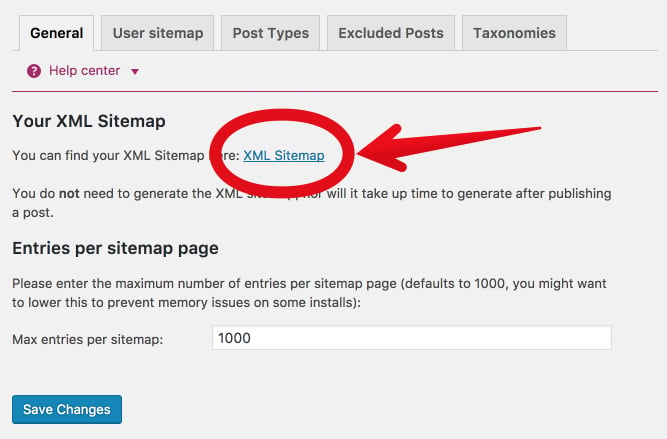
That’s your brand new, shiny XML sitemap. When you open it, you’ll be taken to an actual page on your site. Now, for a small but important part. Copy the last part of that URL
That’s the part of the URL that you’re going to submit to Google in the next step. I’ll include it in the step below so you can easily copy and paste it.
Now, it’s time to submit your Wordpress sitemap to Google.
Step 3: On the left side of the page, click on Sitemaps under the Index section.
Step 4: Add the below code in the provided text field.
Step 6: Press the “SUBMIT” button.
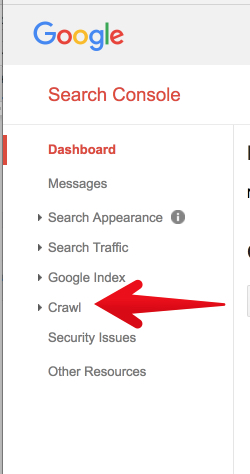
In the left sidebar, click “Crawl.”
Then, click “Sitemaps.”
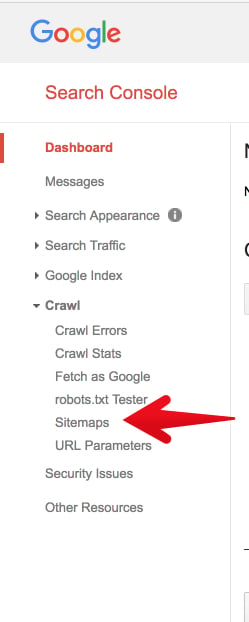
If this is the first time you’ve ever created or submitted a sitemap, there will be nothing to show.
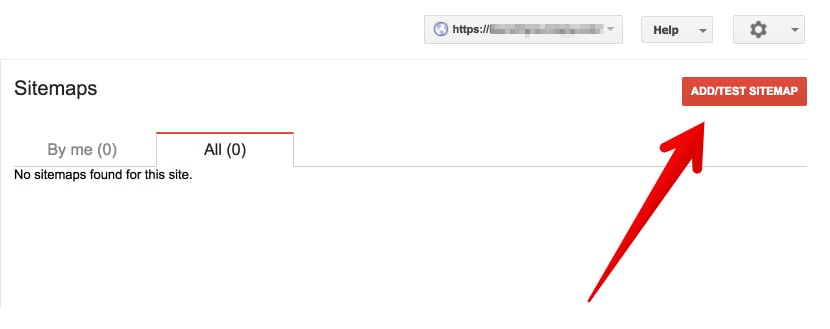
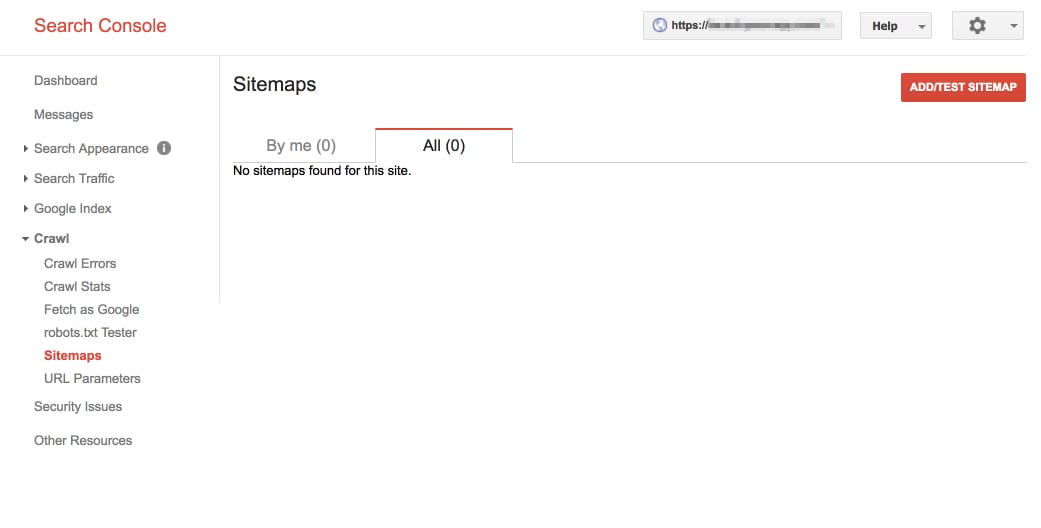
Click “Add/Test Sitemap.” A small box will appear with a place to add your sitemap URL.
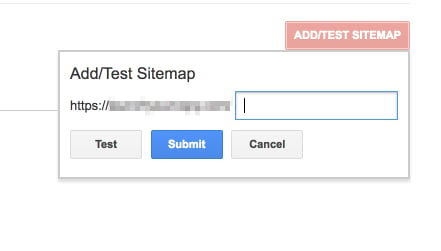
This is where you paste in the section of the URL from your sitemap:
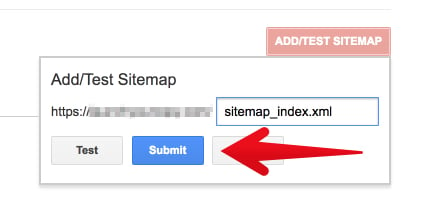
Google Search Console will confirm your submission with the message, “Item submitted.” Go ahead and refresh the page.

After a few minutes of processing, Google will provide a full report of how your sitemap is functioning. That’s it! You’ve successfully generated an XML sitemap for Wordpress, submitted it to Google.
HTML Tag Google Search Console Verification Method
An XML (Extensible Markup Language) Sitemap is a text file used to detail all URLs on a website. It can include extra information (metadata) on each URL, with details of when they were last updated, how important they are and whether there are any other versions of the URL created in other languages. All of this is done to help the search engines crawl your website more efficiently, allowing any changes to be fed to them directly, including when a new page is added or an old one removed.
An XML sitemap is a way of organizing a website, identifying the URLs and the data under each section. Previously, the sitemaps were primarily geared for the users of the website. However, Google's XML format was designed for the search engines, allowing them to find the data faster and more efficiently.
Step 2:If you have multiple sites, then select the desired blog you wish to submit the sitemap for. Go to the upper left corner of your Google Search Console to select your site. But if you don't have multiple sites, you may escape Step 2 and move to step 3.
Step 3: On the left side of the page, click on Sitemaps under the Index section.
Step 4: Add the below code in the provided text field. Here you have the option to choose whether you use an atom.xml or sitemap index file. Note, it is advisable that your sitemap should match the one in the robot.text file. See How To Add Custom Robots.txt File In Blogger Step By Step
Step 6: Press the “SUBMIT” button.
That’s it. You are done with submitting your blogger sitemap to Google Search Console otherwise known as Google Webmaster Tools.
XML Sitemaps
XChecker
Owner: An owner has total control over their properties in GSC. They can add and remove other users, change the settings, see all data, and access every tool. A verified owner has completed the property verification process, while a delegated owner has been added by a verified one. (Delegated owners can add other delegated owners.)
User: A user can see all data and take some actions, but can’t add new users. Full users can see most data and take some actions, while restricted users can only view most data. Think carefully about who should have which permissions. Giving everyone full ownership could be disastrous -- you don’t want someone to accidentally change an important setting. Try to give your team members just as much authority as they need and no further.
There’s a third role: an associate. You can associate a Google Analytics property with a Search Console account -- which will let you see GSC data in GA reports. You can also access GA reports in two sections of Search Console: links to your site, and Sitelinks. A GA property can only be associated with one GSC site and vice versa. If you’re an owner of the GA property.
What’s A Google Search Console Query?
This is a search term that generated impressions of your site page on a Google SERP. You can only find query data in the Search Console, not Google Analytics.
What’s An Impression In Google Search Console?
If the total number of indexed pages on your site drops without a proportional increase in errors, it’s possible you’re blocking access to existing URLs.
full-width
In general, it is easy to use and once you learn how to navigate through the different options and filters, it can become your daily SEO tool. If you’re looking to get higher keywords ranking in google then, using Google Search Console is a must for you. Google Search Console will advise you on several important SEO aspects of your website. Meet all Google Search Console requirements and your website will stand a better chance to get ranked higher on Google search engine result page.
Table Of Content
What Others Are Reading:
How To Show Only Post Thumbnails And Snippets In Blogger Blog Homepage
Meta Tags Explained: How To Add Meta Tags To Blogger Blog
How To Create HTML Sitemap Page In Blogger (With Infographics)
How To Underline Links In Blogger Blog Step By Step - 2 Steps
How To Add Related Post With Thumbnails In Blogger Step By Step - 3 Steps
How To Add Twitter Cards To Blogger And Wordpress Step By Step
Table Of Content
- What Is Google Search Console
- Is Google Search Console Different From Google Webmaster Tools
- Is Google Search Console And Google Analytics The Same
- The Importance Of Google Search Console
- Who Should Use Google Search Console
- How To Set Up Google Search Console
- Google Search Console Verification Methods
- How To Verify Your Site In Google Search Console
- What Is A Sitemap
- Benefits Of XML Sitemaps
- How To Generate Wordpress Website Sitemap
- How To Submit Wordpress Sitemap To Google
- How To Create And Submit Wordpress XML Sitemap In Google Search Console
- How To Verify Your Blogger Blog In Google Search Console With HTML Tag
- How To Create And Submit Blogger XML Sitemap In Google Search Console
- Google Search Console Owners And Permission
- How TO Use Google Search Console
What Is Google Search Console: About Search Console?
Google Search Console is a web service by Google which allows webmasters to check indexing status and optimize visibility of their websites. Until May 20, 2015, the service was called Google Webmaster Tools. In January 2018, Google introduced a new version of the search console, with changes to the user interface. Google Search Console is a free service offered by Google that helps you monitor, maintain, and troubleshoot your site's presence in Google Search results. You don't have to sign up for Search Console to be included in Google Search results, but the Search Console helps you understand and improve how Google sees your site.Is Google Webmaster Tools And Google Search Console Different?
No. They are not. As stated earlier, they are the same names for the single tool. Google Webmaster Tools is what Google Search Console used to be called. Google search console which was earlier known as Google webmaster tool (GWT) found its name in May 2015, when Google decided to rename the tool. Since GWT was being used by bloggers, SEO’s, marketers, it made more sense to change it to Google search console. The idea behind changing the name was to get more users. Google found that the “webmaster” title wasn’t inclusive enough for all its users who range from novice weekender search fans to certified webmasters.What Others Are Reading:
How To Show Only Post Thumbnails And Snippets In Blogger Blog Homepage
Meta Tags Explained: How To Add Meta Tags To Blogger Blog
How To Create HTML Sitemap Page In Blogger (With Infographics)
How To Underline Links In Blogger Blog Step By Step - 2 Steps
How To Add Related Post With Thumbnails In Blogger Step By Step - 3 Steps
How To Add Twitter Cards To Blogger And Wordpress Step By Step
Is Google Search Console The Same As Google Analytics?
No, Google Search Console tells you how your website is performing in Google search while Google analytics shows you what users do when they visit your website, from any online source and not just Google. With Google search console you can see which keywords generated organic traffic to your website and with Google analytics you can see which pages they visited first, how many pages they visited before leaving and many other traffic analysis metrics.Search Console Offers Tools And Reports For The Following Actions:
- Confirm that Google can find and crawl your site.
- Fix indexing problems and request re-indexing of new or updated content.
- View Google Search traffic data for your site: how often your site appears in Google Search, which searches queries show your site, how often searchers click through for those queries, and more.
- Receive alerts when Google encounters indexing, spam, or other issues on your site.
- Show you which sites link to your website.
- Troubleshoot issues for AMP, mobile usability, and other search features.
Google Search Console Features
- Submit and check a sitemap.
- Check and set the crawl rate, and view statistics about when Googlebot accesses a particular site.
- Write and check a robots.txt file to help discover pages that are blocked in robots.txt accidentally.
- List internal and external pages that link to the website.
- Get a list of links that Googlebot had difficulty in crawling, including the error that Googlebot received when accessing the URLs in question.
- See what keyword searches on Google led to the site being listed in the SERPs, and the total clicks, total impressions, and the average click-through rates of such listings. (Previously named 'Search Queries'; rebranded May 20, 2015, to 'Search Analytics' with extended filter possibilities for devices, search types and date periods).
- Set a preferred domain (e.g. prefer example.com over www.example.com or vice versa), which determines how the site URL is displayed in SERPs.
- Highlight to Google Search elements of structured data that are used to enrich search hit entries (released in December 2012 as Google Data Highlighter).
- Receive notifications from Google for manual penalties.
- Provide access to an API to add, change and delete listings and list crawl errors.
- Rich Cards a new section added, for better mobile user experience.
- Check the security issues if there are any with the website. (Hacked Site or Malware Attacks)
- Add or remove the property owners and associates of the web property.
Who Should Use Search Console?
Anyone with a website! From generalist to specialist, from newbie to advanced, Search Console can help you.- Site administrators: As a site admin, you care about the healthy operation of your site. Search Console lets you easily monitor and, in some cases, resolve server errors, site load issues, and security issues like hacking and malware. You can also use it to ensure any site maintenance or adjustments you make happen smoothly with respect to search performance.
- Web developers: If you are creating the actual markup and/or code for your site, Search Console helps you monitor and resolve common issues with markup, such as errors in structured data.
- Business owners: Even if you won't be using Search Console yourself, you should be aware of it, become familiar with the basics of optimizing your site for search engines and know what features are available in Google Search.
- SEO specialists or marketers: As someone focused on online marketing, Search Console will help you monitor your website traffic, optimize your ranking, and make informed decisions about the appearance of your site's search results. You can use the information in the Search Console to influence technical decisions for the website and do sophisticated marketing analysis in conjunction with other Google tools like Analytics, Google Trends, and Google Ads.
Why I Must Use Google Search Console? The Importance Of Google Search Console
Google Search Console tells you the most popular queries causing your website to appear in search results. Google Search Console tells you which queries are driving the most traffic. You can see which websites are linking to yours. You can evaluate how well your mobile website is performing for people searching on tablets and phones.Keywords Management
This is where you can see what keywords are performing and who is searching for what terms related to your industry.
Make Changes And Index Your Site
If you’ve made major changes to a website, the fastest way to get the updates indexed by Google is to submit it in the Search Console so they appear in search results.
Automated Diagnostic Notifications
Sometimes things break. Get automated notifications that something’s wrong with your site before any customers can have a poor experience.
Improve Your Website’s Appearance In Search Results
Google Search Console has various resources that can enhance the way your website appears in search. For one, you can use its Data Highlighter to create rich snippets.
Detect Security Issues
Google alerts you if your website has been hacked or is spreading malware. It also provides solutions that webmasters can take to address the problem.
Learn If Your Site Is Mobile-Friendly
You might have optimized your website for mobile, but do you know if Google really considers it as mobile-ready? Fortunately, Search Console comes with the Mobile Usability module, which reveals the problems that may keep your site from being seen as mobile-friendly. Additionally, Search Console offers a free tool that tests your site’s responsiveness on a mobile device.
Address Broken Links
The last thing you want on your website is a broken link. When a link directs users to a page that shows a 404 error, Google will perceive your site as no longer available. If not fixed promptly, it may remove your page from the search results. The error reports in the Search Console will list down the broken links you have at any given time, so you can address them immediately.
Improve Your HTML
There are a lot of issues that can spell trouble for your site. It can be faulty coding, large images, and duplicate title tags. Google Search Console can provide you with HTML Improvement suggestions so you can keep your website in peak performance.
Google Search Console Product Requirements
Search Console is a web-based product that you use in your browser. Here's what you need to use Google Search Console:- A recent version of any of the following browsers: Chrome, Firefox, Edge, Safari.
- Both cookies and JavaScript must be enabled in your browser.
- A valid Google account.
How To Set Up Google Search Console
Start By Signing In To Google
Google wants to connect the dots between your website (or app) and you, so first you must log in to your Google account. You can sign in through Gmail or anywhere you have a Google account. While signed in to your Google account, navigate to this page in any browser: https://search.google.com/search-console/about. Or Sign in to Google Search Console through your Google account: https://www.google.com/webmasters/tools/
If you have already registered for a Google Analytics account, log in to the Search Console using your Analytics account user and password information. You can also log in with a Google account. If you don’t have a Google account, you must set one up. Go to Google.com and click Sign in. Then choose to create an account and complete the form. (Bonus: You now have access to Gmail and all other Google applications.)
If you have already registered for a Google Analytics account, log in to the Search Console using your Analytics account user and password information. You can also log in with a Google account. If you don’t have a Google account, you must set one up. Go to Google.com and click Sign in. Then choose to create an account and complete the form. (Bonus: You now have access to Gmail and all other Google applications.)
Set Up Google Search Console
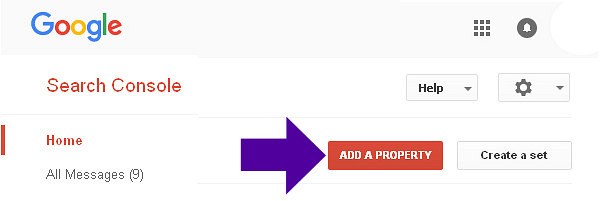
Click the Start Now button.Type in your website (the domain URL, such as http://www.example.com/) or app (for example, android-app://com.eample/) and then click Add Property.
Click ‘Add a Property’.
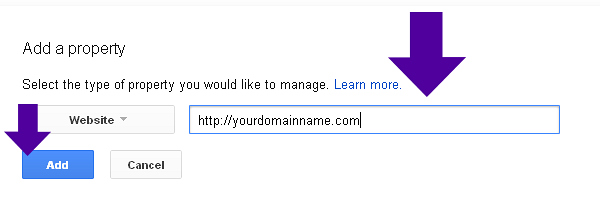
Type in the full path to your domain.
Click ‘Add’.
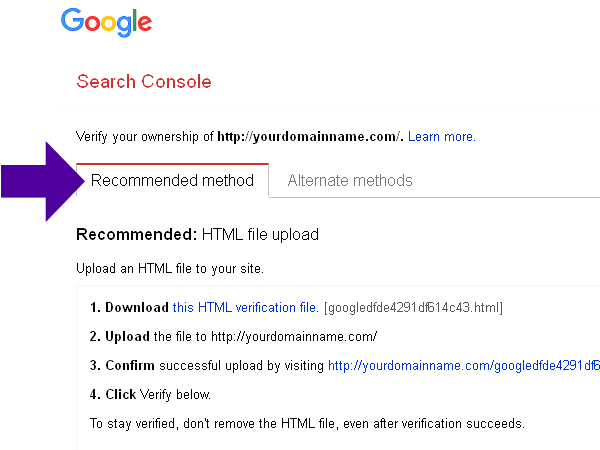
Verify Ownership of your Domain.
Choose from two tabs: ‘Recommended Method’:
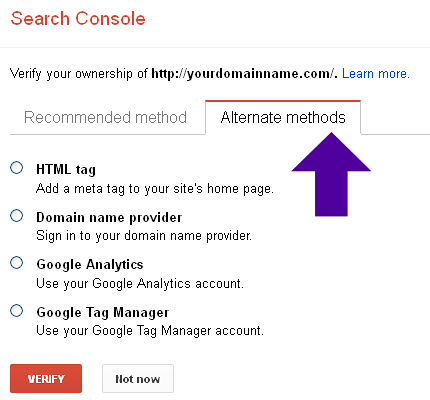
and ‘Alternate Methods’:

Type in the full path to your domain.
Click ‘Add’.

Verify Ownership of your Domain.
Choose from two tabs: ‘Recommended Method’:

and ‘Alternate Methods’:

Google Search Console Verification Methods: How To Verify Your Site In Google Search Console
Verifying your Site on GSC
Because GSC gives you access to confidential information about a site or app’s performance (plus influence over how Google crawls that site or app!), you have to verify you own that site or app first. Verification gives a specific user control over a specific property. You must have at least one verified owner per GSC property.HTML Tag
Select the 'HTML tag' option.
Copy the Google display text line in the shaded box (beginning with <meta name=). Open your home page in your preferred website editor and paste that text into the Head section (near the top) of your home page. This creates a new Meta Tag. Save your changes in your editor program. Go back to the Google Search Console setup page, and click the Verify button.
Domain Name Provider (for self-hosted sites)
Select the Domain Name Provider option. A drop-down list will display.
Choose the company your domain name is registered with. Follow the instructions displayed, will vary according to which domain name provider you have. Click the Verify button.
Google Analytics
If you’ve already set up Google Analytics for your website and you have Administrator permissions, you can verify your site ownership instantly.
Select the 'Google Analytics' option. Click the Verify button.
Google Tag Manager
You have to have ‘manage’ permissions on the Google Tag Manager account
Select the Google Tag Manager option.
Click the Verify button.
Click the Add a property button
After you click on "Add property above, a window will pop out, here you two options either to enter your domain or URL, choose the second option and enter your site URL and hit the "continue" tap.
On the Google Search Console dashboard, at the right side, scroll to the bottom and click on "Settings" under Property settings, you'll see "ownership verification" click on the arrow at the extreme end. You'll be provided with several verification methods, proceed and verify your site. Note, if you've already added a site and verified it, the new site will be verified automatically, and a message will be displayed as such, but still, proceed and add other verifications method to it. That is it, go ahead and verify your site as explained above and below!
Google Search Console Verification Methods: How To Verify Your Site In Google Search Console
- HTML file upload: Upload a verification HTML file to a specific location of your website.
- Domain name provider: Sign in to your domain registrar (like GoDaddy, eNom, or networksolutions.com), and verify your site directly from GSC or add a DNS TXT or CNAME record.
- HTML tag: Add a <meta> tag to the <HEAD> section of a specific page’s HTML code.
- Google Analytics tracking code: Copy the GA tracking code that you use on your site. (You need “edit” permission in GA for this option.)
- Google Tag Manager container snippet code: Copy the GTM container snippet code associated with your site. (You need View, Edit, and Manage container-level permissions in GTM for this option.)
Get Started Using Google Search Console
Once Google verifies your site or app ownership, you can log in and start using your newly set up Google Search Console. Keep in mind that data takes time to collect, so it may be a few days before your new account has data worth looking at. This is an excellent time to take care of a basic but important search engine optimization task: creating a sitemap that will help Google find and index your pages faster. To access the tools, go to http://www.google.com/webmasters/tools/. Sign in, then click the name of the website or app you set up in Google Search Console. Once inside, explore the left-hand menu to try out the many tools and reports. Next is to create and submit your website or blog site sitemap, see below:What Is A Sitemap?
First, we need to understand what a sitemap is, and why submitting your sitemap to search engines is important. An XML (Extensible Markup Language) Sitemap is a text file used to detail all URLs on a website. It can include extra information (metadata) on each URL, with details of when they were last updated, how important they are and whether there are any other versions of the URL created in other languages. All of this is done to help the search engines crawl your website more efficiently, allowing any changes to be fed to them directly, including when a new page is added or an old one removed.An XML sitemap is a way of organizing a website, identifying the URLs and the data under each section. Previously, the sitemaps were primarily geared for the users of the website. However, Google's XML format was designed for the search engines, allowing them to find the data faster and more efficiently.
Benefits Of XML Sitemaps
Why do you need an XML Sitemap, so why create an XML sitemap? The biggest reason you should create and submit your XML sitemap is indexing. Even though search engines can still technically find your pages without one, adding a sitemap makes it so much easier for them. You might have orphaned pages (pages that got left out of your internal linking), or that are harder to find. Your sitemap is especially important when you’ve recently added pages or created a whole new site that doesn’t have a lot of, or any links to it yet.Sitemaps also help search engines crawl your pages more intelligently. They take ‘and` tags into account and can adjust their crawl frequency accordingly. You get to be a little proactive about getting search spiders to visit your pages. Upping the priority level of a page makes it more likely that pages will be crawled and indexed more frequently and before other, less important parts of your site.
If you’ve got a geo-targeted international site or a site that has the same page translated into multiple languages, you can use your XML sitemap to your advantage. Benefits of XML sitemaps, in summary, including but not limited to the following:
- An XML sitemap helps Google and other search engines crawl your website in a more effective way.
- XML sitemap shows Google and other search engines all the pages on your website, even if they are deep within the architecture and might not otherwise be crawled as quickly.
- An XML sitemap tells Google and other search engines to crawl and index your website.
- An XML sitemap helps your website instantly gain indexation for dynamically-generated pages.
- An XML sitemap helps to overcome the limitations of a website with weak internal linking.
- An XML sitemap helps to overcome the challenge of not yet having a strong external link profile.
- An XML sitemap helps extremely large sites gain better and more organized indexation.
- An XML sitemap tells Google and other search engines what to crawl on your website.
- An XML sitemap tells Google and other search engines what kind of information is on your website.
- An XML sitemap tells Google and other search engines when your content was updated (which could result in more favorable or “fresh” rankings).
- An XML sitemap tells Google and other search engines how often your content is updated.
- An XML sitemap tells Google and other search engines how important your content is.
How To Generate A Sitemap For WordPress Website:
Sitemaps can be generated in different ways depending on the platform you are using for your website. For example, WordPress sitemaps can be easily generated using a popular SEO plugin call Yoast SEO.Log in to your WordPress admin.
What we’re going to do first is make sure that the Yoast plugin is all ready to create a sitemap for you. To do so, we’ll need to turn on Yoast’s advanced settings.
Click on the Yoast plugin.
It has a “Y” icon, and says “SEO.” It should be located on the left sidebar.

Click the “Dashboard” option.

From the Dashboard, click “Features.”

From the Features tab, find “Advanced settings pages.”

Switch the advanced settings to “enabled.”

Now, scroll to the bottom and click “Save Changes.”

Great! Now that we’ve turned on Yoast’s advanced features, we have some fresh SEO firepower. You should see that the Yoast menu in the left sidebar has changed. There are a few additional options.

This is where we get into the details of creating your XML sitemap. It’s very simple to do, but I’ll give you the instructions in a detailed way. In the Yoast menu, click XML sitemaps. Note: If you don’t see the menu, click on the “Y SEO” main menu to make the dropdown menu expand.

Here is where you set up your XML sitemap functionality. This is the first tab, “General.” You can leave the settings where they are.

If you make any changes, be sure to click the blue “save changes” button at the bottom. Click the User sitemap tab. If your WordPress site has multiple authors, and you want their author archive URLs to be indexed, you can enable this tab. If you leave it disabled, it won’t harm the full functionality of the sitemap. I’ve left it disabled here because the WordPress site I’m using has a single author.

If you’ve changed anything, click “save changes.” Click on Post Types.

In this section, you’ll decide which types of posts should be indexed. In most cases, you’ll want to include everything (including media) “in sitemap.” If you prefer to keep some of your content hidden or gated, then leave it off the sitemap. Not sure what to do? Keep everything “In sitemap.”
Again, click “save changes.”
Now, click “Excluded posts.”

Do you have any posts that you know you want to keep off the sitemap? If so, add them here. Please keep in mind, if you keep a post off of the sitemap, people can still find it, access it, and view it. And, as if often the case, Google might still index it. If you’ve added any posts to the exclusion list, click “save changes.”
Finally, click “Taxonomies.”

Most likely, you’ll keep the settings here the same. The more tabs you keep “in sitemap,” the fuller and more helpful your XML sitemap will be. If you do make changes, be sure to click “save changes.” Okay, your sitemap is ready! Let’s take a look at it! Go back to the “General tab.”

Under the heading “Your XML Sitemap,” click to view your XML sitemap.

That’s your brand new, shiny XML sitemap. When you open it, you’ll be taken to an actual page on your site. Now, for a small but important part. Copy the last part of that URL
sitemap_index.xml
That’s the part of the URL that you’re going to submit to Google in the next step. I’ll include it in the step below so you can easily copy and paste it.
Now, it’s time to submit your Wordpress sitemap to Google.
How To Submit Wordpress Sitemap To Google
Step 1: Sign in to your Google Search Console Account. This is the new Google Search Console
Step 2:If you have multiple sites, then select the desired blog you wish to submit the sitemap for. Go to the upper left corner of your Google Search Console to select your site. But if you don't have multiple sites, you may escape Step 2 and move to step 3.
Step 2:If you have multiple sites, then select the desired blog you wish to submit the sitemap for. Go to the upper left corner of your Google Search Console to select your site. But if you don't have multiple sites, you may escape Step 2 and move to step 3.
Step 3: On the left side of the page, click on Sitemaps under the Index section.
The "Sitemaps" page will appear, now at the very top of the page under "Add a new sitemap" you'll see your URL with a blank text field space following it with the word "SUBMIT" at the end.
Step 4: Add the below code in the provided text field.
sitemap_index.xml
Step 6: Press the “SUBMIT” button.
Step 7: Refresh the page.
How To Submit Wordpress Sitemap To Google, Using The Old Google Search Console
In the left sidebar, click “Crawl.”

Then, click “Sitemaps.”

If this is the first time you’ve ever created or submitted a sitemap, there will be nothing to show.


Click “Add/Test Sitemap.” A small box will appear with a place to add your sitemap URL.

This is where you paste in the section of the URL from your sitemap:
sitemap_index.xmlClick “Submit.”

Google Search Console will confirm your submission with the message, “Item submitted.” Go ahead and refresh the page.

After a few minutes of processing, Google will provide a full report of how your sitemap is functioning. That’s it! You’ve successfully generated an XML sitemap for Wordpress, submitted it to Google.
How To Verify Your Blogger Blog Site In Google Search Console With HTML TAG
Select the 'HTML tag' option.Copy the Google display text line in the shaded box (beginning with <meta name=).
If you have multiple blog sites in your Google Search Console, you need to select the one you will like to submit a sitemap for at the top right section of your Google Search Console dashboard. On the Google Search Console dashboard, at the right side, scroll to the bottom and click on "Settings" under Property settings, you'll see "ownership verification" click on the arrow at the extreme end. You'll be provided with several verification methods, proceed and verify your site. Note, if you've already added a site and verified it, the new site will be verified automatically, and a message will be displayed as such, but still, proceed and add other verifications method to it. That is it, go ahead and verify your site as explained above and below!
Now Go To Blogger Dashboard Select your preferred blog site.
Blogger Dashboard>>Theme>>Edit HTML
Now that you're in your template codes, click anywhere inside the template and press Ctrl + F simultaneously, this will trigger a search box to appear at the top left of the template, find this code <head> that is copy and paste this code inside the search box and hit enter on your keyboard. Just below it, paste the HTML tag code just below it and save the template or theme.
Alternatively, find the close head tag <head/> and just above it, paste the HTML Tag and save the template. Or find this code <b:include data='blog' name='all-head-content'/> Just below it, paste the HTML Tag code and save template.
This creates a new Meta Tag. Save your changes in your editor program. Go back to the Google Search Console setup page, and click the Verify button.
How To Create And Submit Blogger Sitemap To Google Search Console? What Is An XML Sitemap?
In simple terms, An XML Sitemap is a list of a website’s URLs. That’s why it’s called a sitemap. It maps out how the website is structured and what the website includes. (“XML” stands for “Extensible Markup Language,” a way of displaying information on websites.)An XML (Extensible Markup Language) Sitemap is a text file used to detail all URLs on a website. It can include extra information (metadata) on each URL, with details of when they were last updated, how important they are and whether there are any other versions of the URL created in other languages. All of this is done to help the search engines crawl your website more efficiently, allowing any changes to be fed to them directly, including when a new page is added or an old one removed.
An XML sitemap is a way of organizing a website, identifying the URLs and the data under each section. Previously, the sitemaps were primarily geared for the users of the website. However, Google's XML format was designed for the search engines, allowing them to find the data faster and more efficiently.
How To Create And Submit Blogger Sitemap To Google Search Console?
Step 1: Sign in to your Google Search Console Account.Step 2:If you have multiple sites, then select the desired blog you wish to submit the sitemap for. Go to the upper left corner of your Google Search Console to select your site. But if you don't have multiple sites, you may escape Step 2 and move to step 3.
Step 3: On the left side of the page, click on Sitemaps under the Index section.
The "Sitemaps" page will appear, now at the very top of the page under "Add a new sitemap" you'll see your URL with a blank text field space following it with the word "SUBMIT" at the end.
Step 4: Add the below code in the provided text field. Here you have the option to choose whether you use an atom.xml or sitemap index file. Note, it is advisable that your sitemap should match the one in the robot.text file. See How To Add Custom Robots.txt File In Blogger Step By Step
atom.xml?redirect=false&start-index=1&max-results=500
Or
sitemap.xml
Step 6: Press the “SUBMIT” button.
Step 7: Refresh the page.
Congratulation! You have finished the process of submitting your blog sitemap.
Note: The above sitemap will work for 500 posts only that is if you choose the atom file, the very first code. If you have more than 500 posts published on your blog, then you have to add one more sitemap following the same steps. The Whole procedure will be the same, but at this time you have to add this code.
atom.xml?redirect=false&start-index=501&max-results=1000
That’s it. You are done with submitting your blogger sitemap to Google Search Console otherwise known as Google Webmaster Tools.
Tools To Validate XML Sitemaps
After creating your Sitemaps with all of the right elements and attributes in place, validate them using one of the following tools:XML Sitemaps
XChecker
Conclusion On How To Create And Submit XML Sitemap To Googe Search Console
When done right, XML sitemaps help search engines quickly find, crawl and index websites. Make sure you’ve properly formatted, compressed and submitted your XML sitemap to search engines to get the most of their advantages:- You no longer need to rely on links to get your pages crawled.
- Search engines will see new or updated sites and pages more quickly.
- Bots can crawl pages more intelligently thanks to the meta-information available in sitemaps.
- You can make sure that search engines are finding important information about images and videos, which are inaccessible to crawlers.
- Have you created and submitted an XML sitemap for your website? What benefits have you noticed? Did you encounter any challenges?
GSC Users, Owners, And Permissions
There are two GSC role-types:Owner: An owner has total control over their properties in GSC. They can add and remove other users, change the settings, see all data, and access every tool. A verified owner has completed the property verification process, while a delegated owner has been added by a verified one. (Delegated owners can add other delegated owners.)
User: A user can see all data and take some actions, but can’t add new users. Full users can see most data and take some actions, while restricted users can only view most data. Think carefully about who should have which permissions. Giving everyone full ownership could be disastrous -- you don’t want someone to accidentally change an important setting. Try to give your team members just as much authority as they need and no further.
There’s a third role: an associate. You can associate a Google Analytics property with a Search Console account -- which will let you see GSC data in GA reports. You can also access GA reports in two sections of Search Console: links to your site, and Sitelinks. A GA property can only be associated with one GSC site and vice versa. If you’re an owner of the GA property.
GSC Site Maps Report
After Google has processed and indexed your site map, it will appear in the Site maps report. You’ll be able to see when Google last read your site map and how many URLs it’s indexed.GSC Dimensions & Metrics
There are a few terms you should understand before using GSC:What’s A Google Search Console Query?
This is a search term that generated impressions of your site page on a Google SERP. You can only find query data in the Search Console, not Google Analytics.
What’s An Impression In Google Search Console?
Each time a link URL appears in a search result, it generates an impression. The user doesn’t have to scroll down to see your search result for the impression to count.
What’s A Click In Google Search Console?
What’s A Click In Google Search Console?
When the user selects a link that takes them outside of Google Search, that counts as one click. If the user clicks a link, hits the back button, then clicks the same link again -- still one click. If then, they click a different link -- that’s two clicks. When a user clicks a link within Google Search that runs a new query, that’s not counted as a click.
What’s Average Position In Google Search Console?
What’s Average Position In Google Search Console?
This is the mean ranking of your page(s) for a query or queries. Suppose our guide to GSC is ranking #2 for “What Is GSC” and #4 for “keyword tools.” The average position for this URL would be 3 (assuming we were ranking for literally nothing else).
What’s CTR In Google Search Console?
What’s CTR In Google Search Console?
CTR, or click-through rate, is equal to Clicks divided by Impressions, multiplied by 100. If our post shows up in 20 searches and generates 10 clicks, our CTR would be 50%.
How to Use Google Search Console
How To Identify The Highest Performing Traffic Pages On Google Seach Console
- On your Google Search Console Dashboard, on the left side, Click Performance.
- Click the “Page” tab (next to Queries).
- Change the date range to “Last 12 months”. (A full year gives you a comprehensive overview of your traffic, but feel free to adjust the time period.)
- Make sure “Total clicks” is selected.
- Click the small downward arrow next to “Clicks” to sort from highest to lowest.
Identify The Highest-CTR Queries
- Click Performance.
- Click the “Queries” tab.
- Change the date range to “Last 12 months”. (A full year gives you a comprehensive overview of your traffic, but feel free to adjust the time period.)
- Make sure “Average CTR” is selected.
- Click the small downward arrow next to “CTR” to sort from highest to lowest.
Look At Average CTR
- Click Performance.
- Click the date to adjust the time period. Choose whatever range you’re interested in. (Alternatively, click “Compare” to analyze two date ranges at once.)
- Look at “Total impressions”.
- Go to Status > Performance.
- Click the date to adjust the time period. Choose whatever range you’re interested in. (Alternatively, click “Compare” to analyze two date ranges at once.)
- Look at “Average position”.
Monitor Your CTR Over Time
I recommend keeping an eye on CTR. Any significant movement is significant: If it’s dropped, but impressions have gone up, you’re simply ranking for more keywords, so average CTR has declined. If CTR has increased, and impressions have decreased, you’ve lost keywords. If both CTR and impressions have gone up, congrats -- you’re doing something right!Monitor Your Impressions Over Time
As you create more content and optimize your existing pages, this number should increase. (As always, there are exceptions -- maybe you decided to target a small number of high conversion keywords rather than a lot of average conversion ones, are focusing on other channels, etc.)5. Monitor Average Position Over Time
Average position isn’t that useful on a macro level. Most people are concerned when it goes up -- but that’s shortsighted. If a page or set of pages starts ranking for additional keywords, the average position usually increases; after all, unless you’re ranking for the exact same position or better as your existing keywords, your “average” will get bigger.Identify Ranking Increases And Decreases
- Click Performance.
- Click the “Query” tab.
- Click “Date range” to change the dates, then choose the “Compare” tab.
- Select two equivalent time periods, then click “Apply.”
Identify Your Highest-Traffic Queries
- Click Performance.
- Click the “Query” tab.
- Click “Date range” to choose a time period.
- Make sure “Total clicks” is selected.
- Click the small downward arrow next to “Clicks” to sort from highest to lowest.
Compare Your Site’s Search Performance Across Desktop, Mobile, And Tablet
- Click Performance.
- Go to the “Devices” tab.
- Make sure “Total clicks,” “Total impressions,” “Average CTR,” and “Average Position” is selected.
- Compare your performance across desktop, mobile, and tablet.
Compare Your Site’s Search Performance Across Different Countries
- Click Performance.
- Go to the “Countries” tab.
- Make sure “Total clicks,” “Total impressions,” “Average CTR,” and “Average Position” is selected.
- Compare your performance across nations.
Learn How Many Of Your Pages Have Been Indexed
- Start at “Overview.”
- Scroll down to the Index coverage summary.
- Look at the “Valid pages” count.
Learn Which Pages Haven’t Been Indexed And Why
- Go to Overview > Index coverage.
- Scroll down to the Details box to learn which Errors are causing indexing issues and how frequent they are.
- Double-click on any Error type to see the affected page URLs.
Monitor the total number of indexed pages and indexing errors
- Go to Overview > Index coverage.
- Make sure “Error”, “Valid with warnings”, “Valid”, and “Excluded” are all selected.
The total number of indexed pages on your site should typically go up over time as you:
Publish new blog posts, create new landing pages, add additional site pages, etc.
Fix indexing errors
If indexing errors go up significantly, a change to your site template might be to blame (because a large set of pages have been impacted at once). Alternatively, you may have submitted a sitemap with URLs Google can’t crawl (because of ‘noindex’ directives, robots.txt, password-protected pages, etc.).
In any case, try to diagnose the issue by looking at your excluded pages and looking for clues.
Identify Mobile Usability Issues
- Click Mobile Usability.
- Make sure “Error” is selected.
- Scroll down to the Details box to learn which Errors are causing mobile usability issues and how frequent they are.
- Double-click on any Error type to see the affected page URLs.
Learn How Many Total Backlinks Your Site Has
- Click Links.
- Open the Top linked pages report.
- Look at the box labeled “Total external links.”
- Click the downward arrow next to “Incoming links” to sort from highest to lowest backlinks.
Every backlink is a signal to Google that your content is trustworthy and useful. In general, the more backlinks the better! Of course, quality matters -- one link from a high-authority site is much more valuable than two links from low authority sites. To see which sites are linking to a specific page, simply double-click that URL in the report.
Identify Which Urls Have The Most Backlinks
- Click Links.
- Open the Top linked pages report.
- Click the downward arrow next to “Incoming links” to sort from highest to lowest backlinks.
Identify Which Sites Link To You The Most
- Click Links.
- Scroll down to “Top linking sites” > “More.”
Identify The Most Popular Anchor Text For External Links
- Click Links.
- Scroll down to “Top linking text” > “More.”
Identify Which Pages Have The Most Internal Links
- Click Links.
- Scroll down to “Top linked pages” > “More.”
Have you set up your Google Search Console, created and submitted an XML sitemap for your website? What benefits have you noticed? Did you encounter any challenges? What other SEO-related things do you do for faster indexing of your blog? Remember to share this post with anyone who might benefit from this information, including your Facebook friends and groups, Twitter followers and your LinkedIn Friends! Thanks!
Article "What Is Google Search Console?: How To Use GSC: The Ultimate And Complete Guide To GSC" protected


