Hi! Welcome to the Blogger Blog And Google Search Console Tutorial, How To Set Up Google Search Console For Blogger And Verify Ownership And Submit Sitemap. Once you have your blogger blog running, you can't do without Google Search Console. In this tutorial as the name already suggest, I'll take you through how to set up your google search console, verify your ownership of your blog and submit your blogger sitemap to google. I'll entreat you to read through first and after that take action!
Domain Name Provider (for self-hosted sites)
Select the Domain Name Provider option. A drop-down list will display.
Choose the company your domain name is registered with. Follow the instructions displayed, will vary according to which domain name provider you have. Click the Verify button.
Google Analytics
If you’ve already set up Google Analytics for your website and you have Administrator permissions, you can verify your site ownership instantly.
Select the 'Google Analytics' option. Click the Verify button.
Google Tag Manager
You have to have ‘manage’ permissions on the Google Tag Manager account
Select the Google Tag Manager option.
Click the Verify button.
Note: If you already have at least one property set up, you will see that display instead of the URL entry shown above. To add another website or app, to the extreme upper right corner of the Google Search Console page and just click the Add a Property button and then enter the new site’s URL. If you have multiple sites, you need to click on the drop-down arrow.
HTML Tag Google Search Console Verification Method
An XML (Extensible Markup Language) Sitemap is a text file used to detail all URLs on a website. It can include extra information (metadata) on each URL, with details of when they were last updated, how important they are and whether there are any other versions of the URL created in other languages. All of this is done to help the search engines crawl your website more efficiently, allowing any changes to be fed to them directly, including when a new page is added or an old one removed.
An XML sitemap is a way of organizing a website, identifying the URLs and the data under each section. Previously, the sitemaps were primarily geared for the users of the website. However, Google's XML format was designed for the search engines, allowing them to find the data faster and more efficiently.
Step 2:If you have multiple sites, then select the desired blog you wish to submit the sitemap for. Go to the upper left corner of your Google Search Console to select your site. But if you don't have multiple sites, you may escape Step 2 and move to step 3.
Step 3: On the left side of the page, click on Sitemaps under the Index section.
Step 4: Add the below code in the provided text field. Here you have the option to choose whether you use an atom.xml or sitemap index file. Note, it is advisable that your sitemap should match the one in the robot.text file. See How To Add Custom Robots.txt File In Blogger Step By Step
Step 6: Press the “SUBMIT” button.
That’s it. You are done with submitting your blogger sitemap to Google Search Console otherwise known as Google Webmaster Tools.
XML Sitemaps
XChecker
What Is Google Search Console: About Search Console?
Google Search Console is a web service by Google which allows webmasters to check indexing status and optimize visibility of their websites. Until May 20, 2015, the service was called Google Webmaster Tools. In January 2018, Google introduced a new version of the search console, with changes to the user interface. Google Search Console is a free service offered by Google that helps you monitor, maintain, and troubleshoot your site's presence in Google Search results. You don't have to sign up for Search Console to be included in Google Search results, but the Search Console helps you understand and improve how Google sees your site.Search Console Offers Tools And Reports For The Following Actions:
- Confirm that Google can find and crawl your site.
- Fix indexing problems and request re-indexing of new or updated content.
- View Google Search traffic data for your site: how often your site appears in Google Search, which searches queries show your site, how often searchers click through for those queries, and more.
- Receive alerts when Google encounters indexing, spam, or other issues on your site.
- Show you which sites link to your website.
- Troubleshoot issues for AMP, mobile usability, and other search features.
Who Should Use Search Console?
Anyone with a website! From generalist to specialist, from newbie to advanced, Search Console can help you.- Site administrators: As a site admin, you care about the healthy operation of your site. Search Console lets you easily monitor and, in some cases, resolve server errors, site load issues, and security issues like hacking and malware. You can also use it to ensure any site maintenance or adjustments you make happen smoothly with respect to search performance.
- Web developers: If you are creating the actual markup and/or code for your site, Search Console helps you monitor and resolve common issues with markup, such as errors in structured data.
- Business owners: Even if you won't be using Search Console yourself, you should be aware of it, become familiar with the basics of optimizing your site for search engines and know what features are available in Google Search.
- SEO specialists or marketers: As someone focused on online marketing, Search Console will help you monitor your website traffic, optimize your ranking, and make informed decisions about the appearance of your site's search results. You can use the information in the Search Console to influence technical decisions for the website and do sophisticated marketing analysis in conjunction with other Google tools like Analytics, Google Trends, and Google Ads.
Google Search Console Product Requirements
Search Console is a web-based product that you use in your browser. Here's what you need to use Google Search Console:- A recent version of any of the following browsers: Chrome, Firefox, Edge, Safari.
- Both cookies and JavaScript must be enabled in your browser.
- A valid Google account.
How To Set Up Google Search Console
Start By Signing In To Google
Google wants to connect the dots between your website (or app) and you, so first you must log in to your Google account. You can sign in through Gmail or anywhere you have a Google account. While signed in to your Google account, navigate to this page in any browser: https://search.google.com/search-console/about. Or Sign in to Google Search Console through your Google account: https://www.google.com/webmasters/tools/
If you have already registered for a Google Analytics account, log in to the Search Console using your Analytics account user and password information. You can also log in with a Google account. If you don’t have a Google account, you must set one up. Go to Google.com and click Sign in. Then choose to create an account and complete the form. (Bonus: You now have access to Gmail and all other Google applications.)
If you have already registered for a Google Analytics account, log in to the Search Console using your Analytics account user and password information. You can also log in with a Google account. If you don’t have a Google account, you must set one up. Go to Google.com and click Sign in. Then choose to create an account and complete the form. (Bonus: You now have access to Gmail and all other Google applications.)
Set Up Google Search Console
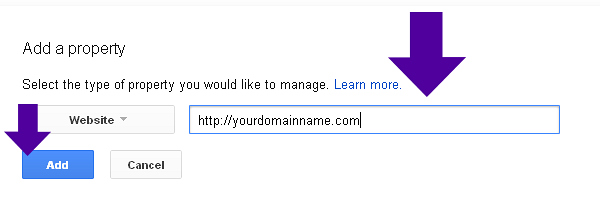
Click the Start Now button.Type in your website (the domain URL, such as http://www.example.com/) or app (for example, android-app://com.eample/) and then click Add Property.
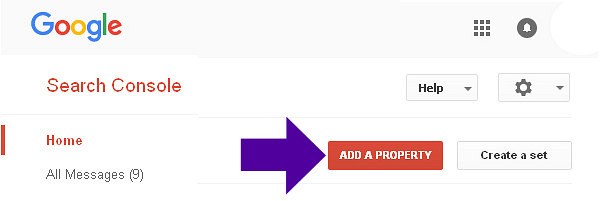
Click ‘Add a Property’.

Type in the full path to your domain.
Click ‘Add’.

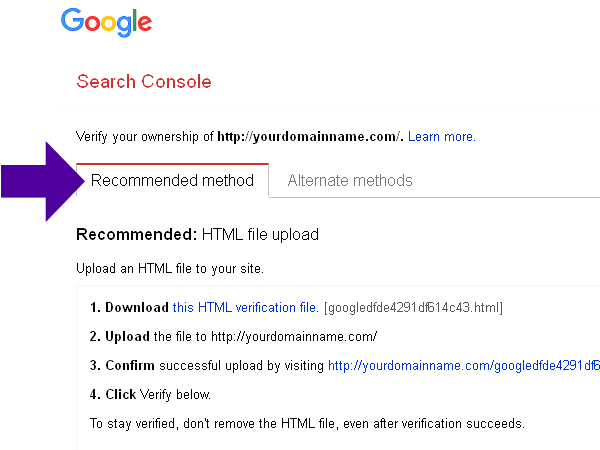
Verify Ownership of your Domain.
Choose from two tabs: ‘Recommended Method’:

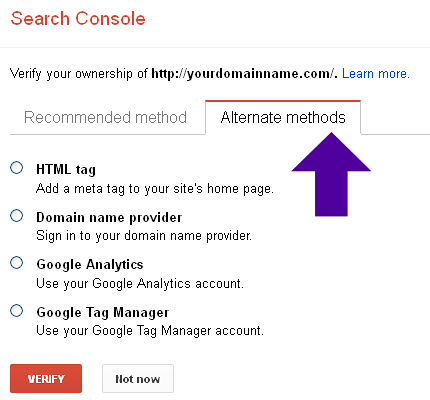
and ‘Alternate Methods’:


Type in the full path to your domain.
Click ‘Add’.

Verify Ownership of your Domain.
Choose from two tabs: ‘Recommended Method’:

and ‘Alternate Methods’:

Google Search Console Verification Methods: How To Verify Your Site In Google Search Console
HTML Tag
Select the 'HTML tag' option.
Copy the Google display text line in the shaded box (beginning with <meta name=). Open your home page in your preferred website editor and paste that text into the Head section (near the top) of your home page. This creates a new Meta Tag. Save your changes in your editor program. Go back to the Google Search Console setup page, and click the Verify button. This method has been explained below, with step by step how to really implement it in your blogger blog.
Domain Name Provider (for self-hosted sites)
Select the Domain Name Provider option. A drop-down list will display.
Choose the company your domain name is registered with. Follow the instructions displayed, will vary according to which domain name provider you have. Click the Verify button.
Google Analytics
If you’ve already set up Google Analytics for your website and you have Administrator permissions, you can verify your site ownership instantly.
Select the 'Google Analytics' option. Click the Verify button.
Google Tag Manager
You have to have ‘manage’ permissions on the Google Tag Manager account
Select the Google Tag Manager option.
Click the Verify button.
Click the Add a property button
After you click on "Add property above, a window will pop out, here you two options either to enter your domain or URL, choose the second option and enter your site URL and hit the "continue" tap.
On the Google Search Console dashboard, at the right side, scroll to the bottom and click on "Settings" under Property settings, you'll see "ownership verification" click on the arrow at the extreme end. You'll be provided with several verification methods, proceed and verify your site. Note, if you've already added a site and verified it, the new site will be verified automatically, and a message will be displayed as such, but still, proceed and add other verifications method to it. That is it, go ahead and verify your site as explained above and below!
How To Verify Your Site In Google Search Console With HTML TAG
Select the 'HTML tag' option.Copy the Google display text line in the shaded box (beginning with <meta name=).
If you have multiple blog sites in your Google Search Console, you need to select the one you will like to submit a sitemap for at the top right section of your Google Search Console dashboard. On the Google Search Console dashboard, at the right side, scroll to the bottom and click on "Settings" under Property settings, you'll see "ownership verification" click on the arrow at the extreme end. You'll be provided with several verification methods, proceed and verify your site. Note, if you've already added a site and verified it, the new site will be verified automatically, and a message will be displayed as such, but still, proceed and add other verifications method to it. That is it, go ahead and verify your site as explained above and below!
Now Go To Blogger Dashboard Select your preferred blog site.
Blogger Dashboard>>Theme>>Edit HTML
Now that you're in your template codes, click anywhere inside the template and press Ctrl + F simultaneously, this will trigger a search box to appear at the top left of the template, find this code <head> that is copy and paste this code inside the search box and hit enter on your keyboard. Just below it, paste the HTML tag code just below it and save the template or theme.
Alternatively, find the close head tag <head/> and just above it, paste the HTML Tag and save the template. Or find this code <b:include data='blog' name='all-head-content'/> Just below it, paste the HTML Tag code and save template.
This creates a new Meta Tag. Save your changes in your editor program. Go back to the Google Search Console setup page, and click the Verify button.
How To Create And Submit Blogger Sitemap To Google Search Console? What Is An XML Sitemap?
In simple terms, An XML Sitemap is a list of a website’s URLs. That’s why it’s called a sitemap. It maps out how the website is structured and what the website includes. (“XML” stands for “Extensible Markup Language,” a way of displaying information on websites.)An XML (Extensible Markup Language) Sitemap is a text file used to detail all URLs on a website. It can include extra information (metadata) on each URL, with details of when they were last updated, how important they are and whether there are any other versions of the URL created in other languages. All of this is done to help the search engines crawl your website more efficiently, allowing any changes to be fed to them directly, including when a new page is added or an old one removed.
An XML sitemap is a way of organizing a website, identifying the URLs and the data under each section. Previously, the sitemaps were primarily geared for the users of the website. However, Google's XML format was designed for the search engines, allowing them to find the data faster and more efficiently.
How To Create And Submit Blogger Sitemap To Google Search Console?
Step 1: Sign in to your Google Search Console Account.Step 2:If you have multiple sites, then select the desired blog you wish to submit the sitemap for. Go to the upper left corner of your Google Search Console to select your site. But if you don't have multiple sites, you may escape Step 2 and move to step 3.
Step 3: On the left side of the page, click on Sitemaps under the Index section.
The "Sitemaps" page will appear, now at the very top of the page under "Add a new sitemap" you'll see your URL with a blank text field space following it with the word "SUBMIT" at the end.
Step 4: Add the below code in the provided text field. Here you have the option to choose whether you use an atom.xml or sitemap index file. Note, it is advisable that your sitemap should match the one in the robot.text file. See How To Add Custom Robots.txt File In Blogger Step By Step
atom.xml?redirect=false&start-index=1&max-results=500
Or
sitemap.xml
Step 6: Press the “SUBMIT” button.
Step 7: Refresh the page.
Congratulation! You have finished the process of submitting your blog sitemap.
Note: The above sitemap will work for 500 posts only that is if you choose the atom file, the very first code. If you have more than 500 posts published on your blog, then you have to add one more sitemap following the same steps. The Whole procedure will be the same, but at this time you have to add this code.
atom.xml?redirect=false&start-index=501&max-results=1000
That’s it. You are done with submitting your blogger sitemap to Google Search Console otherwise known as Google Webmaster Tools.
Tools To Validate XML Sitemaps
After creating your Sitemaps with all of the right elements and attributes in place, validate them using one of the following tools:XML Sitemaps
XChecker
Conclusion On How To Create And Submit XML Sitemap To Googe Search Console
When done right, XML sitemaps help search engines quickly find, crawl and index websites. Make sure you’ve properly formatted, compressed and submitted your XML sitemap to search engines to get the most of their advantages:- You no longer need to rely on links to get your pages crawled.
- Search engines will see new or updated sites and pages more quickly.
- Bots can crawl pages more intelligently thanks to the meta-information available in sitemaps.
- You can make sure that search engines are finding important information about images and videos, which are inaccessible to crawlers.
- Have you created and submitted an XML sitemap for your website? What benefits have you noticed? Did you encounter any challenges?
I tried to cover as much as I could about How To Create And Submit XML Sitemap To Googe Search Console, it helps to increase your website’s organic traffic. And If you enjoyed this blog article, share it with your friends who wish to learn How To Create And Submit XML Sitemap To Googe Search Console and want to improve site traffic. If you have any challenges regarding this, feel free to ask in the below comment section!
full-width
Article "Set Up Google Search Console For Blogger And Verify Ownership And Submit Sitemap" protected


